
Sascha Feider

Forum Replies Created
-
AuthorPosts
-
This being a free course there is no course submission I believe, but you can post it either here in the forum or even better and easier to add multiple images etc in the gallery with the “add yours” button.
Really cool. Love the touch with the old cartoons 🙂
Not sure if snapping them all together works at all in this case.
Here’s an easy way to do it: Add a flat lattice under your seats and give it some good amount of subdivisions along the bend of the plane. Then give the lattice object a shrinkwrap modifier and select the plane as the target.
Now give the seats a lattice modifier and select the lattice you’ve created. That should give you the effect you’re looking for.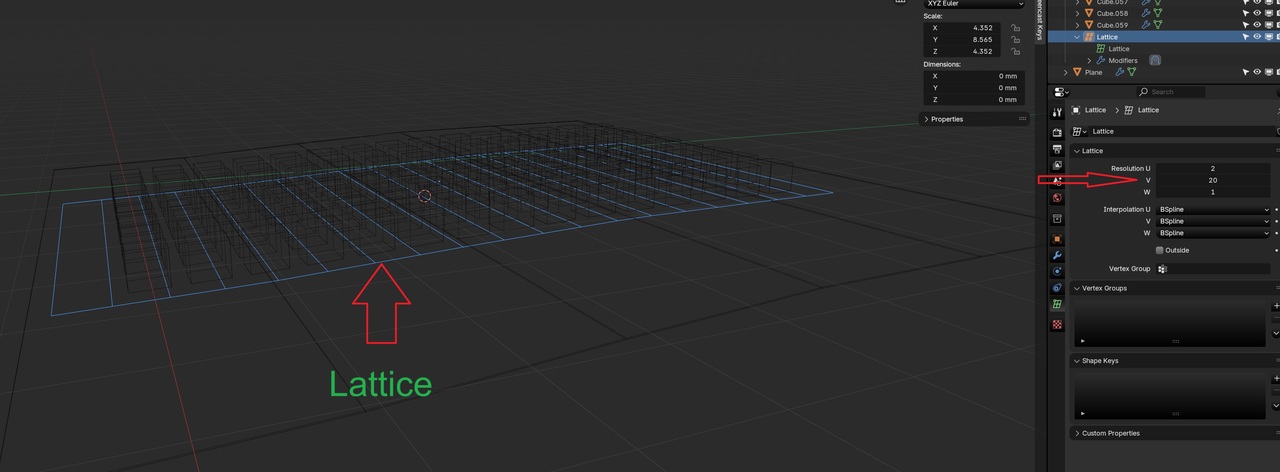
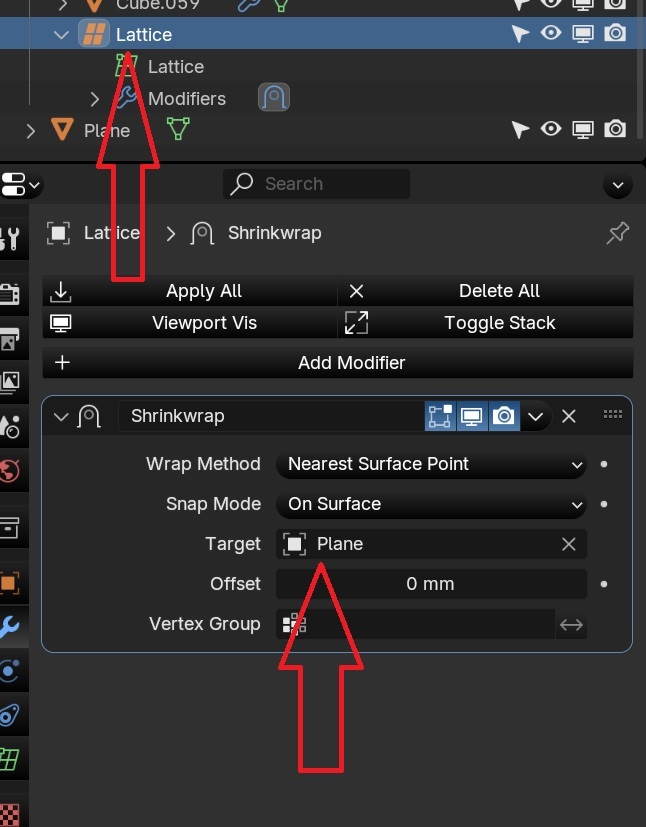
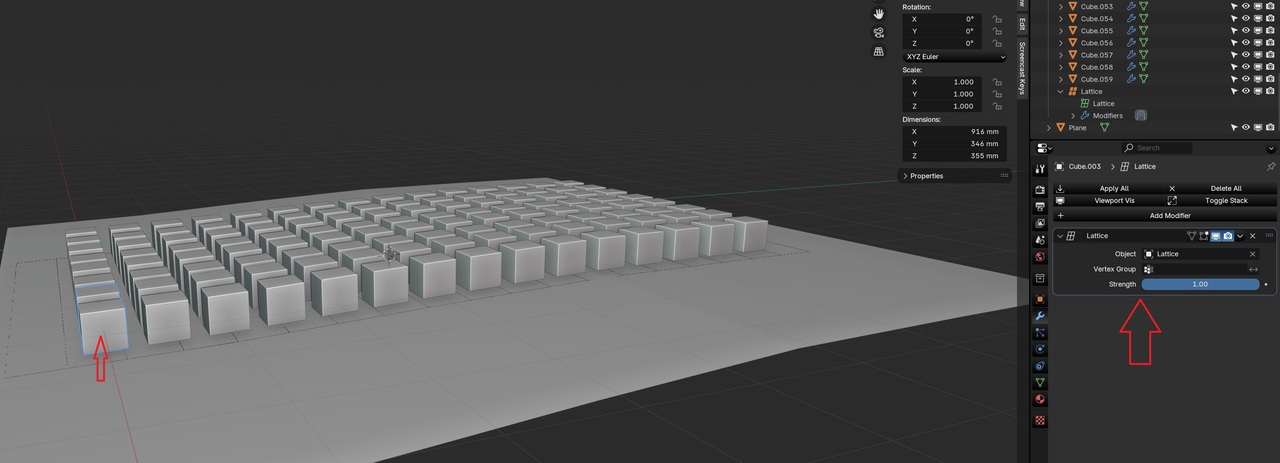
Best part is this way you can easily make changes too.
I would second Dwayne. Select your object and in the n-panel under item or in the object properties under transform check if the scale is 1;1;1, if not ctrl+A and apply scale. That should fix it.
Also note that on non-rectangular objects you gonna want to toggle “even thickness” in the modifier.Option 2 is correct. That is the replacement for the old auto-smooth. It’s undergone a few revisions since it’s been introduced in 4.0. Now when you right click and shade auto-smooth it conveniently adds the modifier automatically. In the modifier you can then adjust the angle to get the desired result. So you’re right on track 🙂
That’s because the holes are made via a boolean modifier, meaning they’re not real geometry and therefore not affected by the shade auto smooth or its modifier.
If you want the holes to be smoothed you need to shade auto smooth the cutter object “hole punch bools” and adjust the angle on it until everything is smooth. The smoothness will then be transferred over to the object it’s cutting into.
October 3, 2024 at 8:00 pm in reply to: Freshly Baked Modeling Challenge 17 – Extension Chord #90051A used extension cord where the ground prong isn’t broken off? That must be fake. 😀
I agree with Dwayne. The advanced mode is so powerful yet it seems to be so underappreciated.
Welcome to the community 🙂
For every day objects, buildings, vehicles etc. it can also help to add a model of a human to your scene so you can model beside that as a reference.
What you got there is the classic case of double vertices (notice one being pulled away).
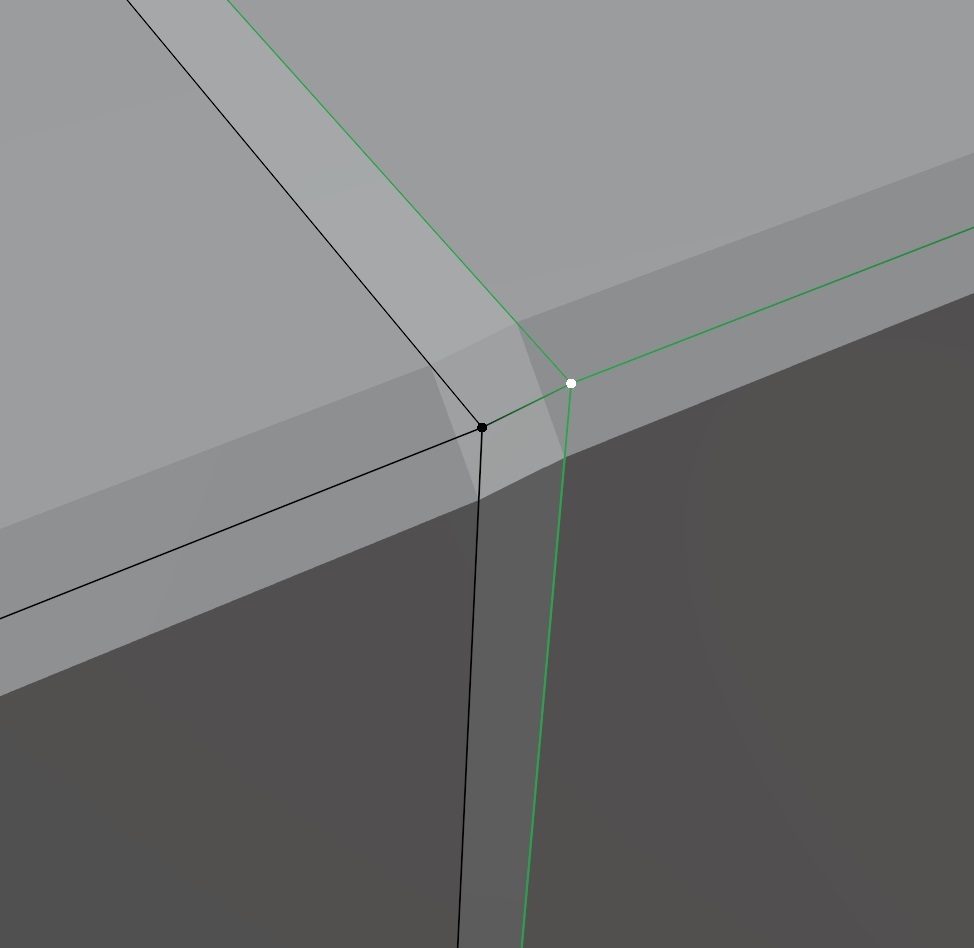
Happens all the time and is not directly obvious. It can happen for example when you cancel but not reverse (ctrl+z) an extrusion or hitting the wrong button by accident. No worries though, that’s an easy fix: In edit mode hit A to select everything then M -> merge by distance.
If you run into an issue like this that’s usually the first thing I’d check. I like to call it the “Try turning it off and back on again” of mesh modelling in Blender. 🙂 Note on the bottom how many vertices are removed after doing this.
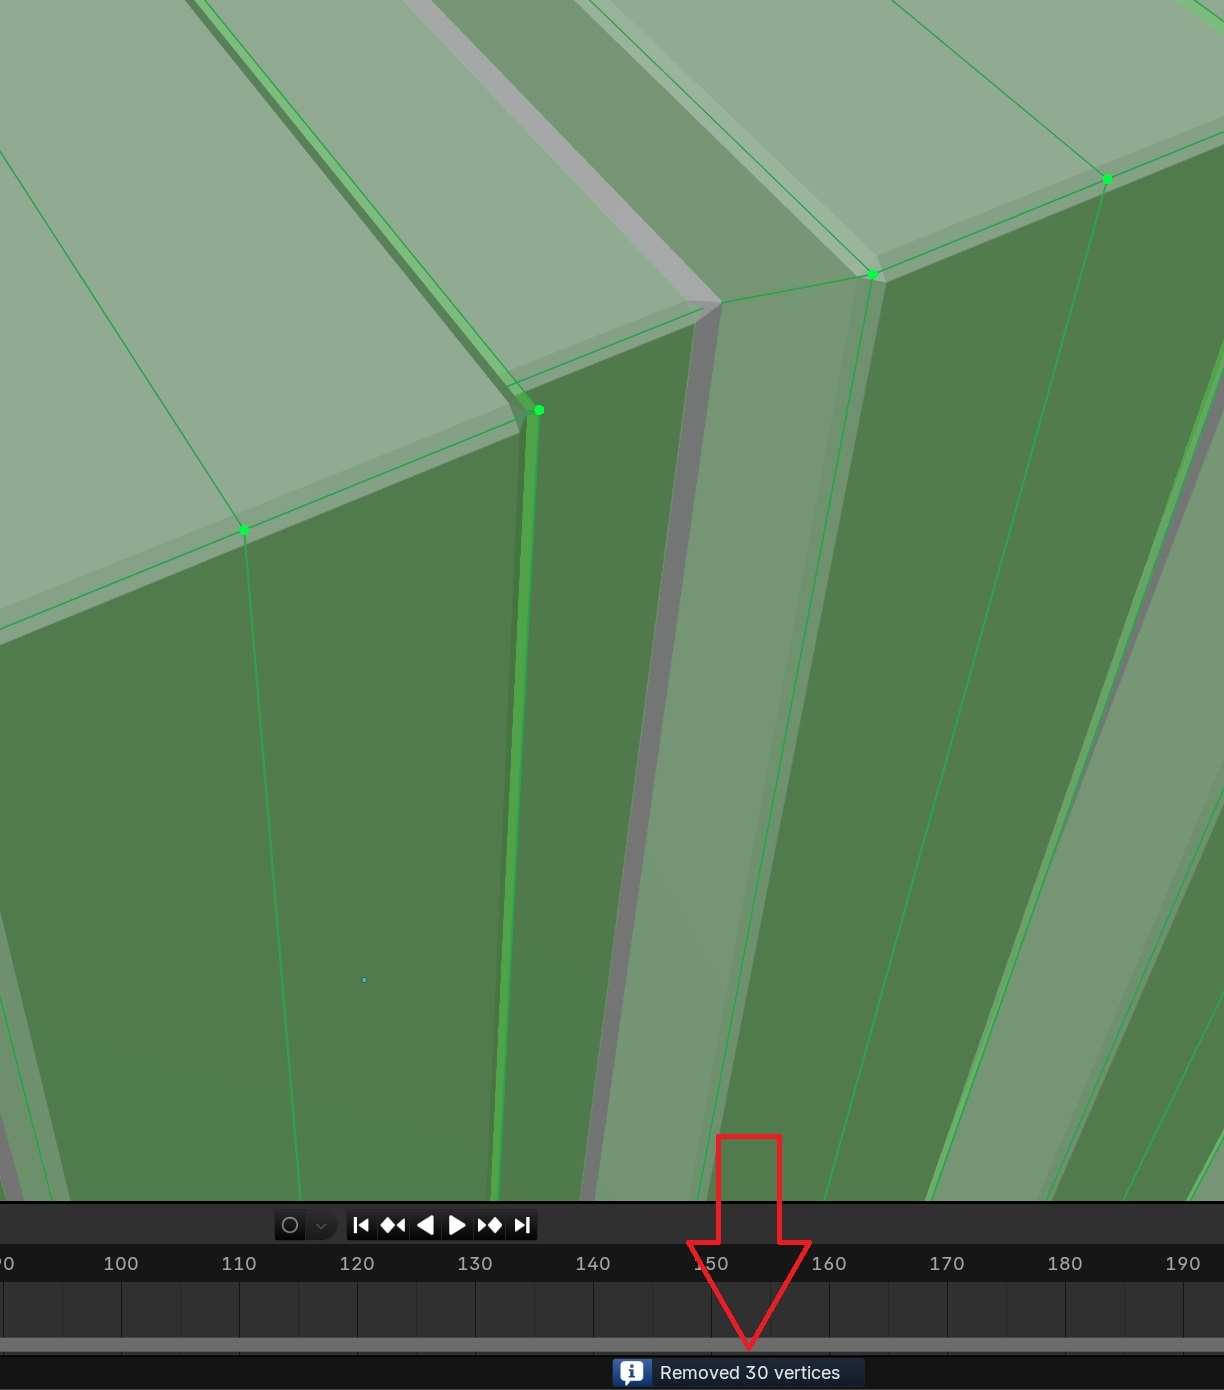
Crate looks very nice, btw. Keep it up 🙂
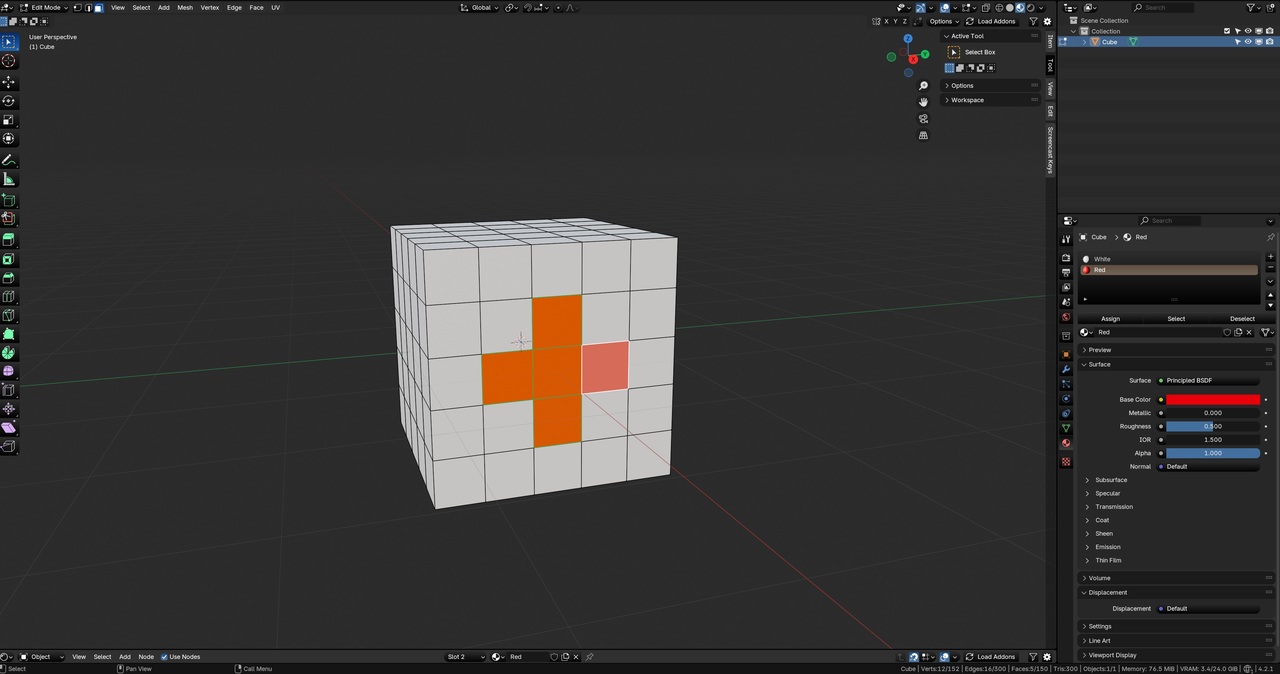
September 16, 2024 at 1:02 am in reply to: Is it possible to assign materials to specific polygons as well? #89485You sure can. Once you have created your materials in different slots as shown in the video, go into edit mode and select the faces you want to have the different material on. With those selected click on the material slot of choice and hit assign. So it’s the same process as before with linked components, whatever parts of the mesh you select you can give a new material, in this case the red cross on a white cube.
There’s a coming soon page you can check to see what’s in development. It gets updated regularly:
The holes are made with a modifier (boolean), which means they’re not real geometry. Because of that the shading auto smooth does not affect the holes. You can fix this by shading the cutter object that makes the holes auto smooth and adjust the angle in its modifier. The smooth shading will then transfer to the holes.
Mind that it will not make them perfect circles. In order to achieve that you need more geometry on the cutter. You can do that easily by adding a bevel modifier with a very small bevel value and after that a subdivision surface modifier with a value of 1 or 2 depending on your desired result.
September 8, 2024 at 9:08 pm in reply to: I’m doing the “Blender Core Skills: The Ultimate Blender Basics Bundle” and need major help with the materials class. #89135The shaders have changed a bit too since 2.83 but since that is the version the course file was saved in and you say a newly created file works just fine, the problem is most likely that something in the course file is linked to a setting that has been overhauled since. In that case there shouldn’t be anything wrong with your system, seems powerful enough.
Blender files are usually backwards compatible to a certain extend, but the changes between 2.83 and 4.2 are quite significant. I just opened said file in my 4.2.1 and get the same noise and it looks totally funky. So rest assured it’s the file compatibility, not your system.

Edit: Just opened the same file with 3.6 and 4.1.1 and it works totally as intended, no noise.
-
AuthorPosts
