
Sascha Feider

Forum Replies Created
-
AuthorPosts
-
Cool, I didn’t know about that custom orientation 🙂
To your first point: If you change the transform orientation from global to local it should work just fine unless you have applied the rotation. Pivot point can stay as median point.
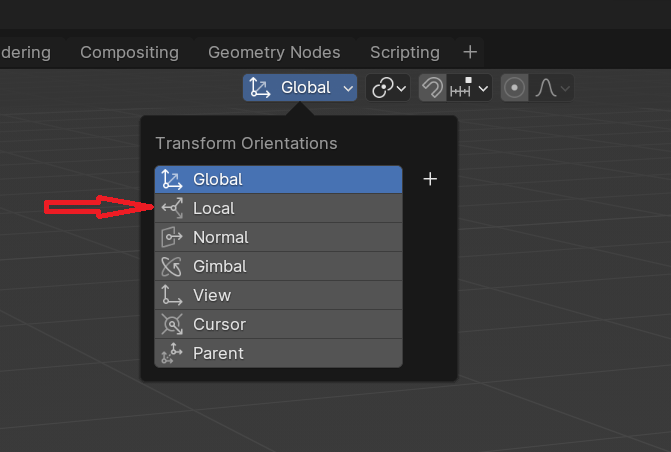
If you have applied the rotation you can manually slide the vertices with g+g along the edge and if you hold alt you can go past the original position upwards. Problem here will be the destructively modelled bevel which will cause problems there. You could take the very top face and alt+e -> extrude face along normals and then drag the other vertices along one by one with g+g.
I might be overthinking this 🙂
To your second point: With those changing directions of the loops it is mostly unavoidable to have 3- or 5- poles. I learned that recently. You still have nice quads so some poles will always be there when you change loop direction. :/
There are multiple ways as usual but the simplest would probably be – assuming you run the image texture through the principled BSDF – to decrease the roughness. A more accurate way would be to add a coat (clearcoat before 4.0) withing the principled BSDF and play with it’s roughness. That would be a more accurate way as the coat gets applied kind of as a top layer on the image.
You could of course also mix shader a glossy bsdf in and play with it’s values and the mix factor, but why get so complicated. 😉
Of course it always depends on the use case – realism vs. stylized etc.
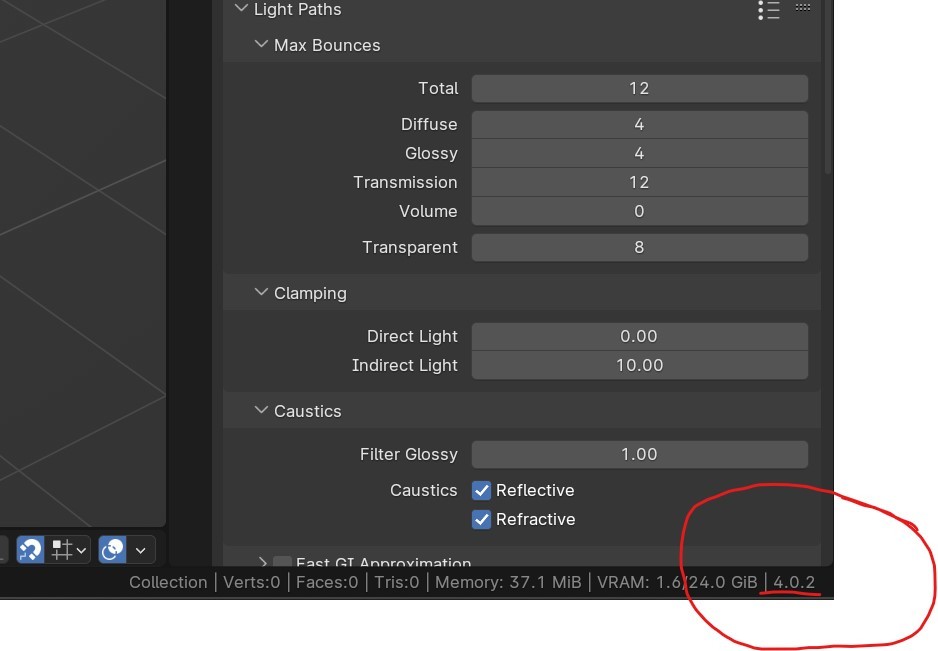
Bottom right corner of the UI shows the Blender version – in this case 4.0.2
The tutorial was made with 3.4.1, as you can see right under Kent’s left shoulder/arm (right from your point of view).
Aren’t those on youtube already? I definitely watched one a couple of days ago.
Dwayne is right, shear is the answer. Things of note with this tool: You should only use it in the view you want the shearing to happen, i.e. front, top or side view. It doesn’t work properly in perspective.
Also once you activate the tool you can either drag the mouse for desired angle or type 1 or -1 for 45 degrees. It also might be necessary to hit x or y before dragging or entering the value to get it to shear along the correct axis.
Weird is where I thrive lol
I’ll make sure about the origins next time for sure.
Thanks so much guys, got it working. Duplicated the faces like Omar suggested, made an edge loop along the middle and turned it into a curve. Still had to move the text around weirdly to get it into position. Do the origins have to be in the same place?
Pretty much everything important has been said already. I’d like to add one more possible pitfall to avoid: Comparison.
Especially as a beginner you see all those great renders and artworks out there and it’s easy to loose confidence because you can’t produce anything like it yet. So as in other professions (it’s what I always tell young apprentices in my occupation) don’t compare yourself to anyone else. Take inspiration and goals from it, but don’t compare yourself. Everyone’s situation is different and people learn at a different pace, mostly due to their individual circumstances. Only compare yourself to your yesterday’s self. See improvement? Good. No improvement? Keep working on it.
It’s a toughie but you got this 🙂
AgX is overall better if you’re shooting for realism. For my Arcgh-viz projects for example I don’t even consider filmic anymore, only use AgX. It has a higher dynamic range and is more capable of displaying colours more accurately, especially in very bright or overexposed scenarios. It also handles energy conservation better influencing reflection, refraction (aside from the new Principled BSDF) and the way materials handle light, taking away some of that weird glow effect you sometimes get with filmic. You might find renders a bit darker at first in comparison, but it is way more realistic.
This guy has a pretty good handle on the technical differences: https://www.youtube.com/watch?v=YsTQEzcmD5w
As far as I know all those menus (shader, add menu etc) have been changed that you can now just open them and start typing what you want without hitting search first. Not sure if you can change it back, but I find it much faster now to just press shift+a and type first couple of letters of lets say color ramp and it pops right up and I can click it without going through the menus first. Once you’re used to it you might find it very convenient. Same goes for the modifiers for example.
Select two opposing edges and press F to fill to create one face. Then as long as you have quad topology (four vertices per face) you can select the vertical edge on the face and just hold F and it will keep adding faces until you’re around or you hit an n-gon.
Or you activate the built-in addon Mesh: Loop tools. With that activated you can select both edge loops -> right click -> loop tools -> bridge. This will connect both edge loops with clean topology.
Nice, didn’t know about that advanced mode yet. Another arrow in the quiver 🙂
Actually it’s not a nightmare at all. I’m doing it on a regular basis ( I’m a cabinetmaker) and really only ever touch CAD these days when I need to make a technical drawing for the plumbers or electricians. Everything else I design completely in Blender without major addons and even pull my measurements out of it for cut lists. Works like a charm and less programs needed. And keeps costs down. 🙂
As far as the sliding is concerned it works precisely to the mm as long as the scale of the object is applied. In object mode press ctrl-A ->apply scale. Check object properties or n-panel under “item” if scale is 1.000 in all axis. Then in edit mode you can slide and move your edge loops, vertices etc in any direction with g->axis you want to move in->amount (check top left corner).
Scaling is a bit different as the scale value is a percentage value. To grow an edge loop on let’s say a cube in the middle by 50mm total in both x directions you have to select one edge and move it by 25 in X direction, then the opposite side by -25 in x direction. Now your whole loop is 50mm bigger in X.
Alternatively if you can use the shrink/fatten function with alt-s, which goes by the amount. Make sure to press S again to check even thickness before pressing enter. (top left corner to check).
-
AuthorPosts
