
Backhoe Contribution – Blanchsb – Exterior Loader Arms and Interior Chair
Forum Archive › Backhoe Contribution – Blanchsb – Exterior Loader Arms and Interior Chair
- This topic has 215 replies, 9 voices, and was last updated 5 years, 10 months ago by
Rita Geraghty.
-
AuthorPosts
-
June 29, 2020 at 12:18 pm #56884
My only hang-up is the hydraulic hoses will need to dynamically bend
That is something I tried to do with this project: https://cgcookie.com/u/spikeyxxx/projects/bee-hicle and I couldn’t do it. It is possible to hook the ends of the hoses (being Curves) to Empties for instance, but then there wouldn’t be any interpolation between the ends…
I guess this is a case for @waylow ‘rigging curves’ …
I do remember seeing an old CGCookie tutorial on rigging a telephone cord: https://www.youtube.com/watch?v=raQs9f4x0gw
maybe that technique can be used here? I’ll have to re-watch that…
June 29, 2020 at 9:15 pm #56885I’ll try to watch that after my zip tie project is complete. Thanks for all of the resources @spikeyxxx
June 29, 2020 at 10:42 pm #56886You don’t need empties anymore, you can rig a curve with bones.
It’s the same technique but ‘hook’ them to a control bone instead of an empty. That way they part of the same armature object and easily animated (rather than being seperate objects with non zero rest positions)
I did a really quick demo if this in the second Rigging stream earlier this year.
I can’t remember the time stamp but here’s the link https://cgcookie.com/live_streams/blender-rigging-tid-bits-2(NOTE: I haven’t read the whole thread but some of the images are looking flipping fantastic. I’m just mentioning this in case I’m way off base with my answer)
June 30, 2020 at 8:21 am #56887As the details pile on, how are you feeling about rigging this monster @waylow?
June 30, 2020 at 12:51 pm #56888I can work with @waylow on the loader arm assembly if that helps. I actually want to learn this part of the workflow. He and @spikeyxxx are already guiding the path. I doubt I’ll have it rigged by the next live stream but perhaps that can be my next assignment @theluthier ?
June 30, 2020 at 1:18 pm #56889Hey Shawn, as @waylow said this could be done with bones, I remembered that we have Bendy Bones in Blender now, so that might be a way to rig the hoses…
There are many tutorials about how to use Bendy Bones… here’s one by Jayanam: https://www.youtube.com/watch?v=BsJ3Grq_3GM
It’s made with 2.78 but it still works.
June 30, 2020 at 8:21 pm #56890I did think it was going to be a simple rig, but it looks super complicated now haha.
Bendy bones don’t play nicely with curve objects (only real geo). But you want to keep those cable as curve objects. It’s going to make things easier in the long run. Hooks and curves are the way to go for these types of cables.
It might be possible to have the Hook bones stick to a bendy bone with an armature constraint – I haven’t rigged anything that way before but I think it would work nicely. (for the cable sections that are between the arm segments and need to bend).
But that also might be overkill.
I’m happy for Shawn to rig it and I can help if he gets stuck.
June 30, 2020 at 11:18 pm #56891Thanks @waylow yes I think I am going to want to keep the bezier curves active in my opinion while I rig these lines (some of them have protective springs around them that are also using a curve modifier. Kent is running the show so I suppose it is up to @theluthier if he is okay leaving modifiers on to provide support for rigging (I think this is the right thought process?).
On a completely separate and very fun note:
I finally made my “how I dunnit” video that Kent requested for making my zip ties. I also covered the unique solution for my hose protective springs. I will post this to our main channel for the whole team to enjoy as well.Y’all get to listen to the soothing sultry sounds of my voice yet again……..back by popular demand!
July 1, 2020 at 1:29 pm #56892Thanks a lot, @blanchsb, for this great tutorial 👍! Very clear and instructive.
July 1, 2020 at 2:28 pm #56893@blanchsb Sir………you’re a pro! Supreme explanation + demonstration. 60 fps with a face cam AND your audio sounds better than my “fancy” podcaster mic.
Y’all get to listen to the soothing sultry sounds of my voice yet again
Not an exaggeration.
Should [something so small] have that many faces?
It depends on the situation! If we were building this only to be seen in full view (not up close) then no, such a small part wouldn’t need this many faces / this much attention. But since we can make whatever camera angles we want for the showcase reel, it’s A-ok! Most importantly you said it yourself: “I learned a lot doing this exercise.” The learning is unquestionably worth it.
Thanks a ton for sharing, Shawn! Very impressive work 👏
PS: I cannot believe the lengthening of the array curve produces that “teeth clicking” effect! How cool!
July 1, 2020 at 8:56 pm #5689460 fps with a face cam AND your audio sounds better than my “fancy” podcaster mic.
@theluthier Thank you for the overly kind words Kent!
Here’s the reality behind the “magic” haha.
 I do not have a professional recording studio by any means. I am in a big open room in our family/dinning area. No sound pads. But here is what I do have if anyone is interested: prices are in American dinero. I have acquired this stuff over a period of years but much of it has come in the last 12 months.
HARDWARE:
Monitor: Samsung U32R59x curved monitor from Costco (I saved up for it and bought it during the Covid required work from home mandate). ~$350 if I rememberPC: Lenovo Legion Y545 Gaming Laptop with NVIDIA GTX graphics card from Costco (I saved up for this last year $1400)
Face Camera: Xbox One Kinect Sensor with windows power and A/V adapter kit from ebay on top of a cheap Amazon tripod. $120 for Kinect Bundle and $15 for tripod. I actually want to post how I got this set up because it is a complete motion capture studio where I can use it to capture my body and rig it to a live armature. There were many hiccups setting this up but it was totally worth it. I’ll perhaps do a video on this. Credit to Remington Creative for teaching me 90% of the setup. The other 10% took a while to figure out though.
Microphone: Xbox One Turtle Beach Wireless Stealth 420X+ Gaming Headset (bought it used and had to refurbish the earmuffs, I also added and extra pop-pad onto the mix so it technically has 2 of them. Total price ~$60-$100 including new ear pads from Wicked CushionsSOFTWARE:
Modeling Software: Blender: Given (free)
Screen Capture and Studio Recording Software: OBS Studio (free)Settings on OBS: I made a few different scenes but my custom Kinect Scene is growing to be my favorite.
 Mic: Turtle Beach and I have some OBS audio filters added. I watched best practices for audio filters and how you need to tune yours to your own studio setup and not copy anyone else but rather understanding some important reasons for them.

Video: Kinect with some video cropping to focus on that handsome bald head of mine! That Kinect camera has a pretty wide view angle and can get a good portion of my room so using it as a face came was actually just a delightful bonus!
Display Capture: Desktop (Upper 1/3 of the desktop only) I have to scale blender down actually and I turn up the display to 1.5 so words are easier to read for the recording. I also use the Shortcut VUr add-on to capture my keys and mouse (Screencast Keys add-on stopped working for some weird reason). My screen resolution is awesome but it comes up really crappy if I try to capture the 32″ screen and post it to youtube. So I found that using only a portion of it and zooming the display in blender made things easier for someone to read. I use my laptop screen to judge whether the size was correct for a standard viewer.Extra Stuff that I love having around while I work: Every professional studio should come equipped with these!
Wife and kids: obviously! but I record when kids are in bed because no amount of audio filter keeps these little Blanch’s from being heard, and my wife likes watching me geek out on my passion project when they are in bed.
Tablet: iPad Pro 12.7″ (I got this after working horrific schedule at work and made a lot in overtime back in 2017). I use EasyCanvas as the tablet program but am anxiously waiting for AstroPad and Luna to come to Windows. This works quite well for texture painting and sculpting lessons. $1300
Keyboard: Logitech MX Keys Wireless multi-device bluetooth and unifying receiver keyboard $100 (got it as my main Christmas gift). This keyboard let me turn off the Caps Lock!!!!!! I hit that darn button all the time when I mean to hit shift during modeling.
Mouse: Logitech M720 multi-device bluetooth and unifying receiver mouse. The multi-device feature works nicely because I can use my iPad with both mouse and keyboard with the click of 1 button on them. $40 at Costco
Custom picture mouse pad (don’t remember the price)
Orange Tiger Striped Tabby American Short Hair Cat – He was a rescue. His name is Timmy. (He made an appearance in the video) Black Newfoundland-Poodle Mix: She was a breeder’s. Her name is Lottie. She cools off on our tile most days.
 July 4, 2020 at 8:26 pm #56895
I came across my submission #1 today while I was plowing through adding some of the final pieces to my ugly stick. Man I have come a long way with this project!
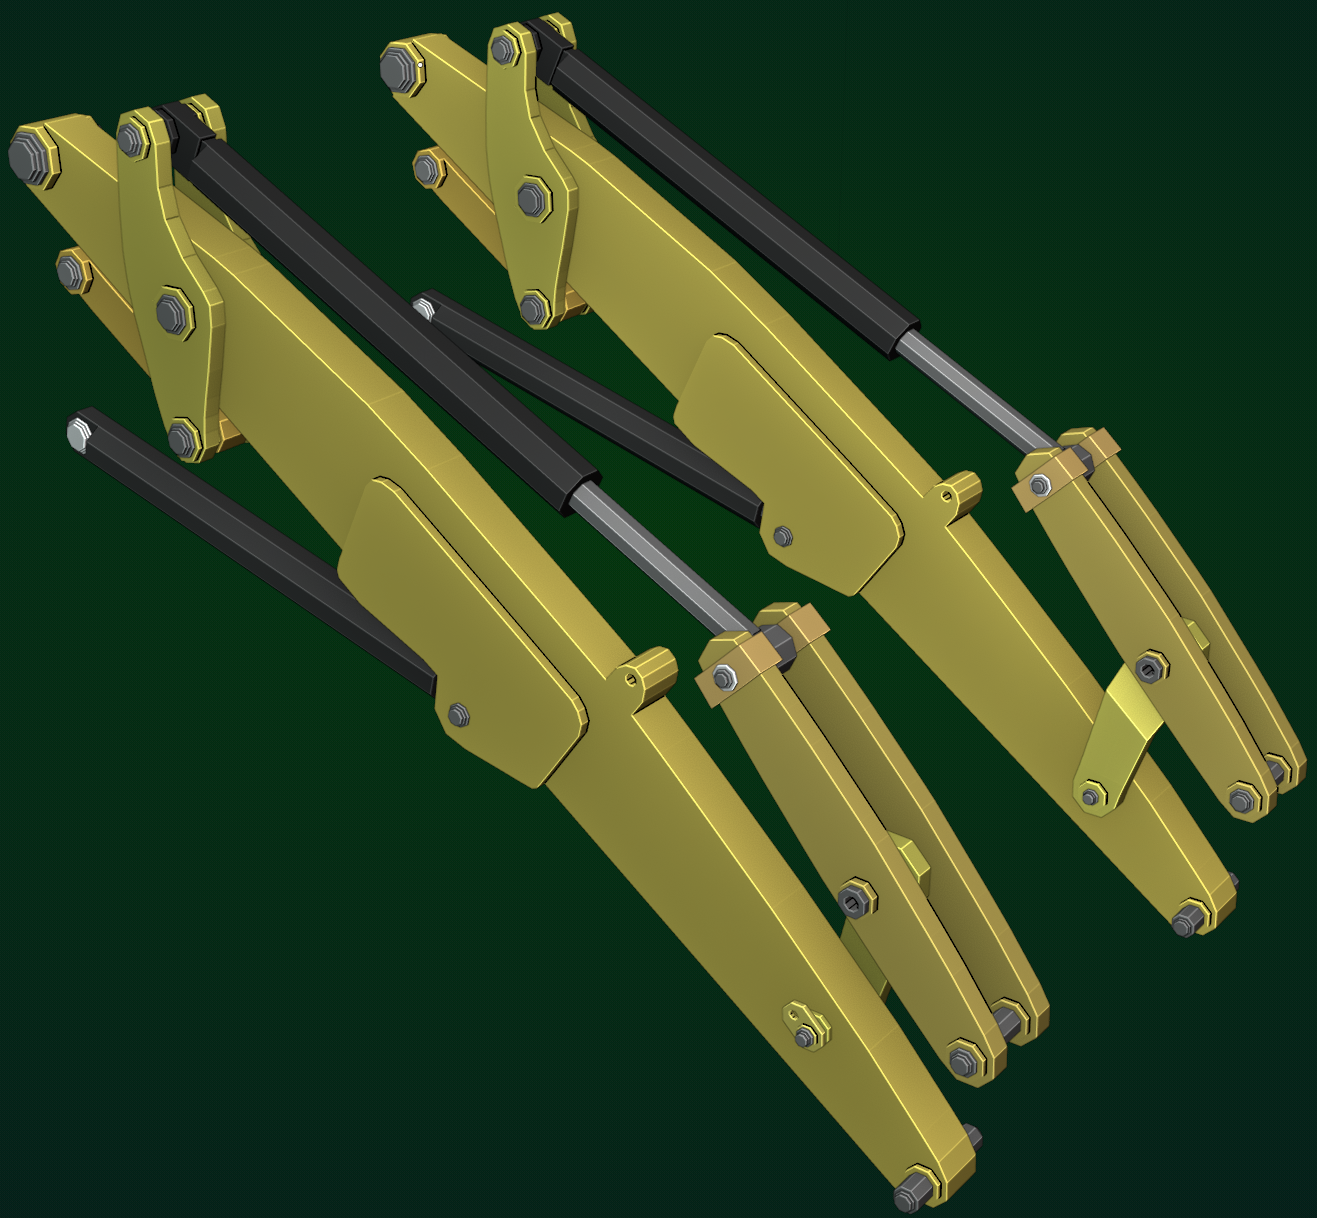 Block-Out Submission #1: 13k Faces
 Current Progress: Preparing for Submission #5: 2.8 Million Faces with Sub-D; 1.8 Million without……..and climbing.
I can definitely say that I have learned a lot during this live stream journey. This is probably the most instructive project I have done and a great introductory into hard surface modeling. Thanks @theluthier for guiding us along.
July 5, 2020 at 3:27 am #56896Now, I want to see this in action: brooooooooooooooooooooooooooooooooooom 😁
July 5, 2020 at 11:22 pm #56897Getting down to the last pieces now.
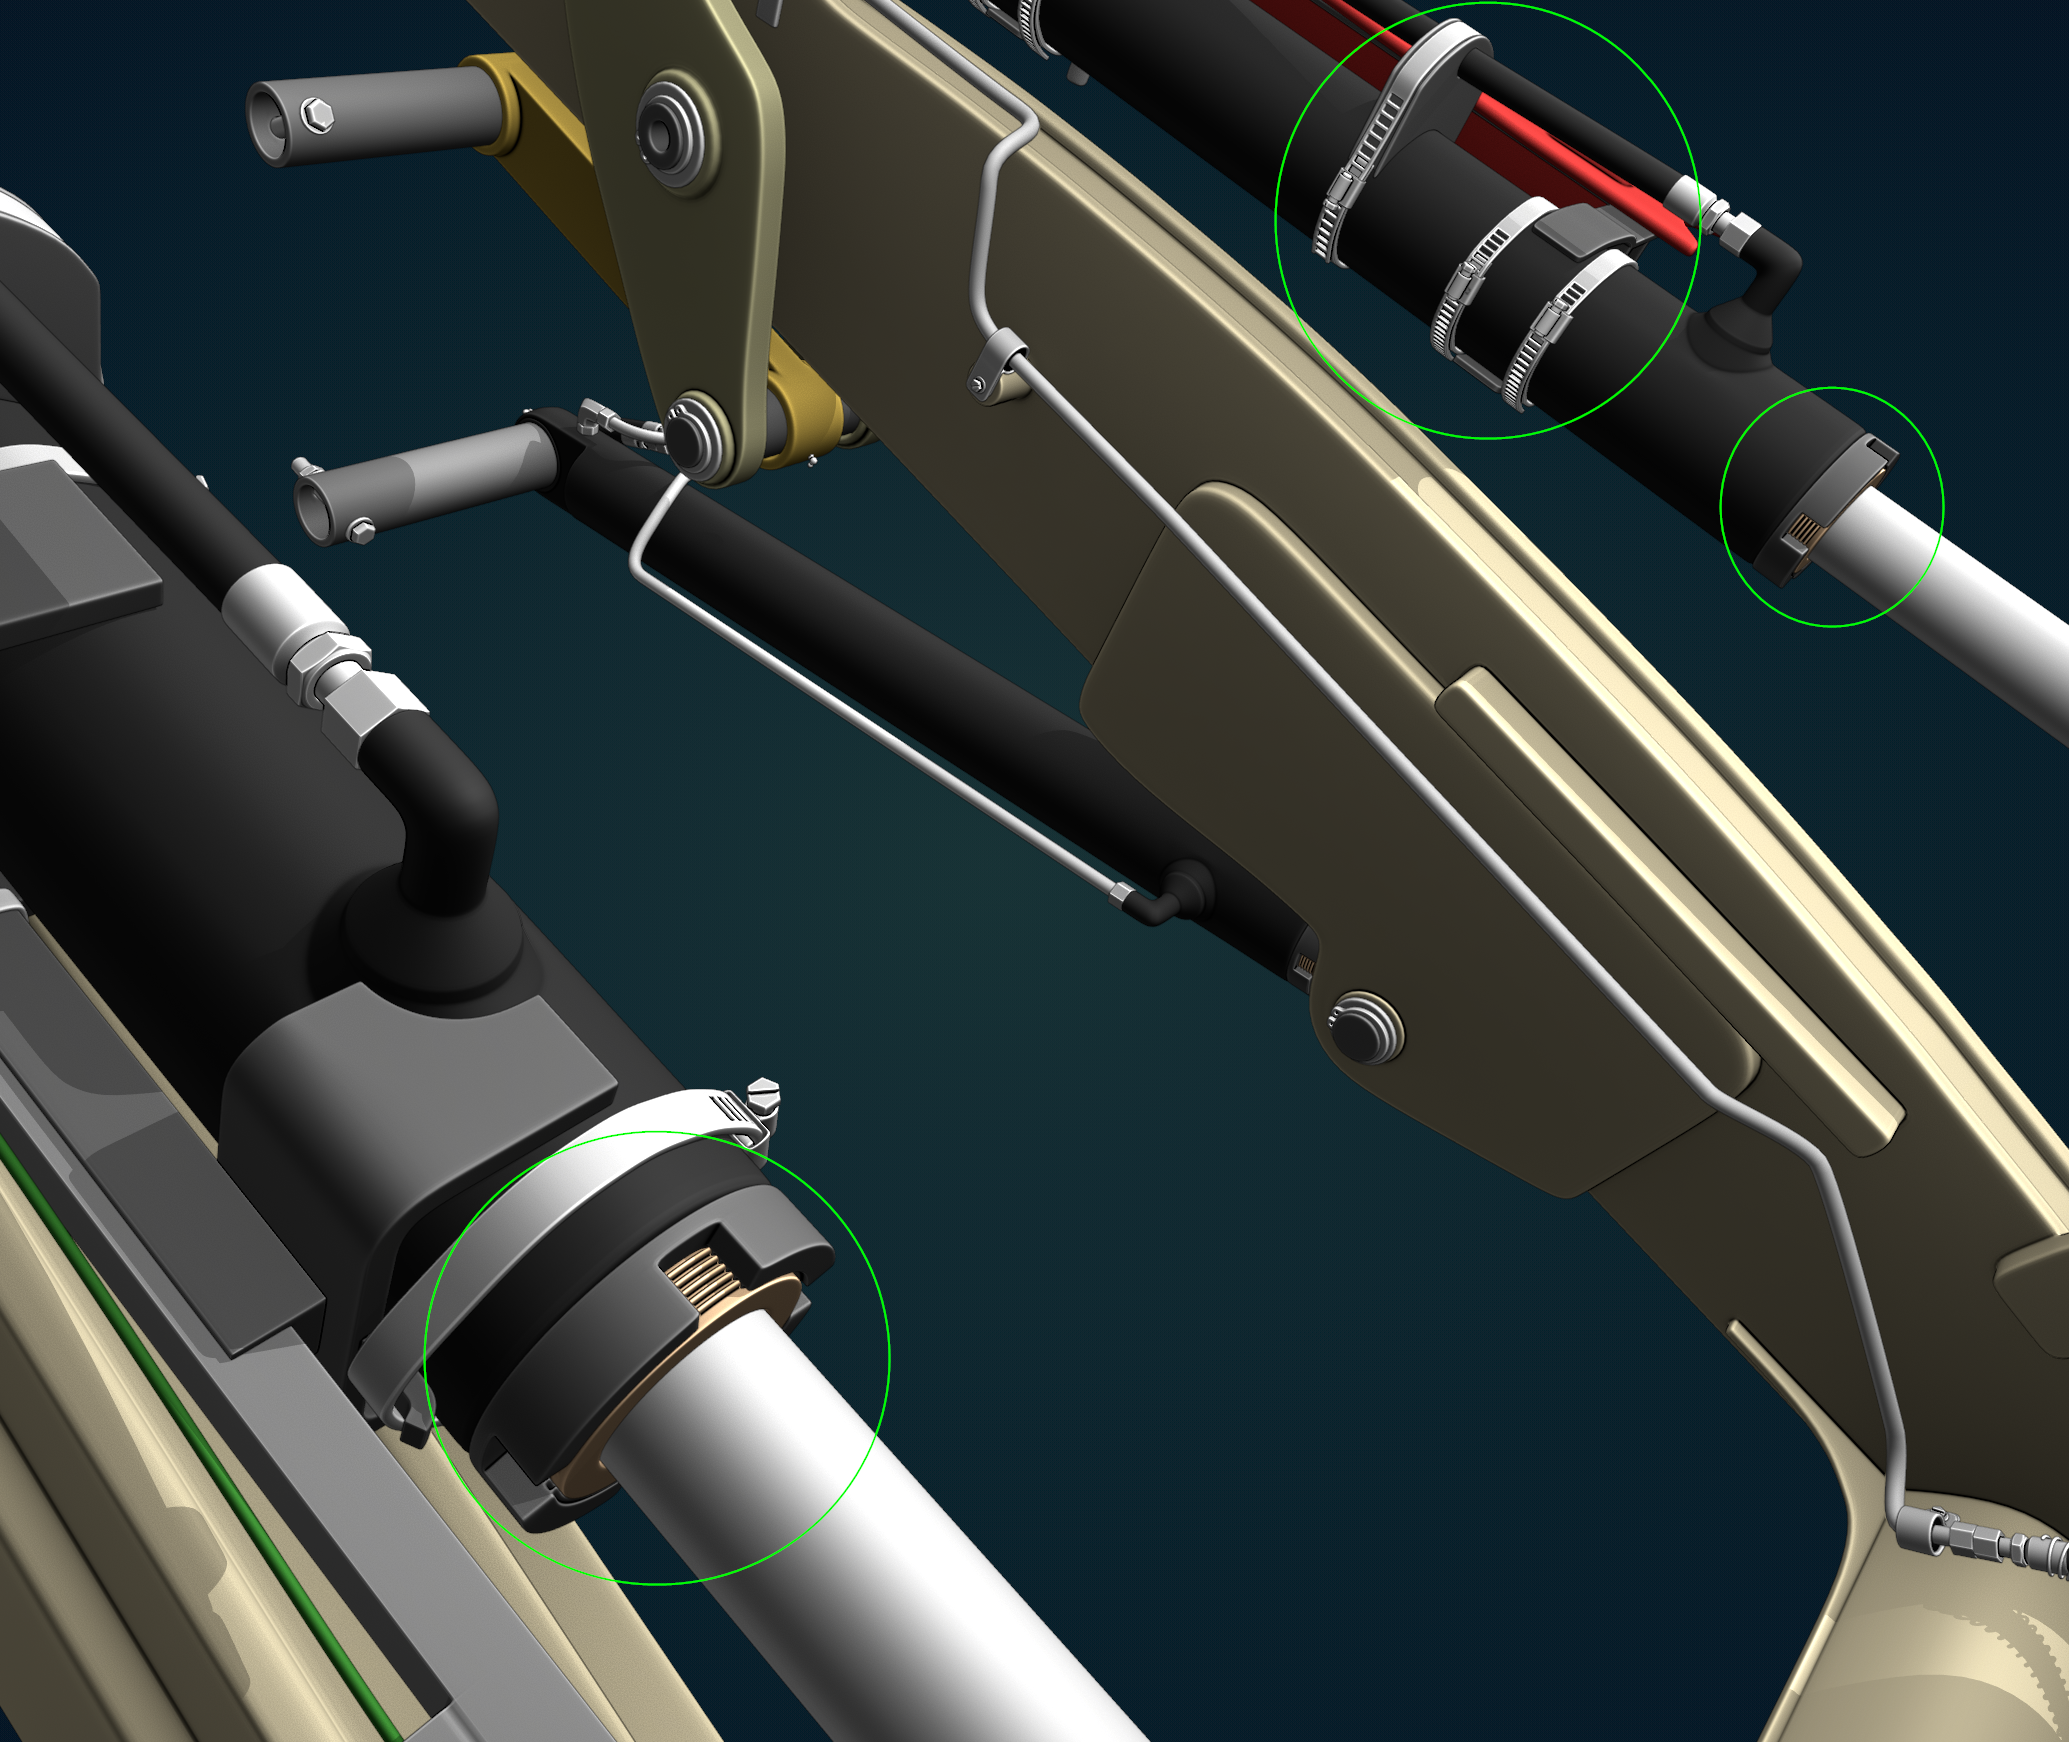
I re-modeled the end caps for the hydraulics. I think this is the 4th time re-working them. I decided that they were screw caps and went with it. Creating the housing with the male threads was not terribly hard. But the housing with female threads was more work than I thought. because the piece needed the same threads and covered the entire inner diameter.
I left a few topology pieces with some triangles on the inside diameter. I decided it wasn’t worth the trouble after spending a few hours on this. They won’t be seen and the effort required didn’t feel like value added haha. I think it looks good overall.
I also finalized all of the Jubilee clips and they are no longer tied to their bez curves.
All I have left is the position the sensor hardware and protective plate and I am calling it complete for the stream.
 July 5, 2020 at 11:38 pm #56898
I have to admit. Turning on the other assemblies gets me excited for the live stream every time.
I am working on a collaboration file so some of the assemblies are missing but still…….
It’s cool to turn that stuff on to check how things look in the big picture. I’m pumped to see everyone’s progress come together.

-
AuthorPosts


- The topic ‘Backhoe Contribution – Blanchsb – Exterior Loader Arms and Interior Chair’ is closed to new replies.