
[ENDED] BC1-1801 – January Class Homepage – Getting Started with 3D Modeling & Blender
Forum Archive › [ENDED] BC1-1801 – January Class Homepage – Getting Started with 3D Modeling & Blender
- This topic has 662 replies, 53 voices, and was last updated 8 years, 7 months ago by
LJ Simpson.
-
AuthorPosts
-
January 29, 2018 at 11:52 am #32850
Ooo yes, the final image (lighting + materials + sculpt) looks great! All that fur isn’t an easy thing to sculpt and you did a good job. Pretty appealing character overall. You’ve earned an A this week for sure.
January 29, 2018 at 11:56 am #32851I don’t see any special addon being used in that video – Just the screw modifier which comes with Blender.
It’s a cool technique shown in the video! I personally would model it from an 8 or 12 sided cylinder by cutting and scaling edge loops to match the reference image. The bottle shape could be achieved with many fewer polygons in the basemesh than what the tutor demo’d.
January 29, 2018 at 12:11 pm #32852I would like just again ask regarding the “shrinking” effect of the Smooth brush.
Watching the tutorials like for example at the scuplting of Melvin, after the smooting of the body Kent switches to the camera view and the with the Grab brush adjusting back the outlines to the artwork. Is that a correct perception from me or missing something?
Anyway okay basically that is not “shrinking” by the Smooth brush as it just simply averages the surface, but so in summary by that finally making the object slightly always smaller. Presumably that happened also at several homeworks here at the sculpting of the mesh primitives, especially at the Cone examples.
Could you please advise by your experience, is that not disturbing in the precision of sculpting? Would not be better in Blender to calculate the averages towards the closest face to the camera? Then maybe the size of the object would not be changed
January 29, 2018 at 12:12 pm #32853I also agree – pretty dang good! The human face is arguably THE easiest model/sculpture to critique (and picked apart). Sure the sculpt and anatomy may not be perfect (as if anyone’s has ever been ‘perfect’) but it’s clearly humanoid and it’s clear that you’re learning. You aimed high this week and you have something to show for it, both it knowledge and in this image. You’ve earned an A, my man 👍
January 29, 2018 at 12:26 pm #32854What a unique, super cool way to apply everything you’ve learned in this class! I love that damage detail. Very convincing model. This would accept textures and shaders beautifully.
I just love it! Excellent work this week and thanks for sharing about your workflow too. Grade-A work 👏
January 29, 2018 at 12:29 pm #32855Wow this is turning out really well @jmac05. You’re keeping very true to the artwork. I know that face a mile a way 😀
Even though you’re not quite done, it seems apparent that you challenged yourself and your succeeding. Great stuff for the last week: You’re earning your A.
January 29, 2018 at 2:01 pm #32856I agree with Kent… I probably would have used 1/3 or 1/4 of the verts that he used and maybe half the steps since he used the subsurf after, but I likely would have used a cylinder as well. One detail I note he left out is that indention on the bottom every plastic and glass cup have.. but that’s probably just nitpicking, as you wouldn’t see it unless the bottle was animated and lifted up in a way that you could see the bottom.
Here, he used the modifier, but you could also use the spin tool in the T panel… the difference being if you wanted to adjust it, you’d have to make sure to select the entire loop and scale or move it rather than a single vertex.
If you want to fill it with water (or give it a glass or clear plastic material in general), you’ll want to add some thickness. The Solidify modifier would be good for that. Otherwise, it won’t look quite right.
January 29, 2018 at 3:46 pm #32857@alexsr if you were inspired by that video, you might would be interested also in this one https://youtu.be/Nb3WT5MmAW0 which details how to “lathe” in Blender.
It is just 8 minutes and showing a very interesting way where the shape of any bottle, vase can be changed fast and dynamically, in the meantime also controlling the number of vertices around.
January 29, 2018 at 10:32 pm #32858BC1-1801 Week 4 Homework Submission
I honestly spend the least amount of time on this submission over my others due to work time constraints this week. With my limited time I wanted to tackle a unique shape: a folded paper boat.
I am excited to take what I have learned and continuing courses on CG and bettering my abilities as a modeler. I got to use 3D modeling for my first time this week at my job to show a mock up of a live event space, and we landed the job!:)
I look forward to the March class! Excited about the subject.
 January 30, 2018 at 6:23 am #32859
BC1-1801 Week 4 Homework Submission
Ι spend couple of hours to create this creature , i wanted to do retopology plus uv mapping and paint also
but did not had the time .
https://sketchfab.com/models/65a775f02d0e4d6e9f79de1ccc522ae1
 January 30, 2018 at 8:46 am #32860
Something else I thought I’d share… One thing that having this class has done for you is provided you with a place to get (and give) feedback. While you can get some here, you might actually find it easier to find feedback (maybe even faster) other places. For example, there’s a number of groups with Blender as a focus on Facebook. Another great place is BlenderArtist.org. Some places aren’t as great at “catering” to new users, but you can still get some valuable feedback.
Feedback is important. Sometimes, we get so close to our projects that we start to overlook something that might be obvious to someone else. Finding even 3 or 4 people you can ask for feedback can really do wonders to helping make your work better.
Sometimes, though, people are too general in asking questions. They ask a question, but don’t provide enough details or any visual reference to help illustrate the problem. If you are trying to get feedback, try to be clear on what you need help with and if you’re having a problem, pictures and/or blend files go a long way to helping to find what needs to be done to fix a given issue.
If you’re nearing the end of a project, it can still be helpful asking for more general help. When you are going general, try to give some clue as to what you see is the point of the image or the intent behind the image. It may be obvious to you, but it might not be obvious to someone else.
On the other side, when giving feedback, try to take into account any stated intent. Nothing annoys me more than when I have a stated intent and I get feedback that goes contrary to that intent. (Believe it or not, it happens all the time.)
And on any feedback you get, it’s ultimately up to you whether to take it or not. I’ve had a number of times where I got feedback that I didn’t think was right for my project, but upon reflect, I realized that it was exactly what I needed. It helps to keep an open mind. At the same time, though, just because someone says something about your piece doesn’t make them automatically right. If at first you don’t agree with it, let it sit for a day or two. And if you still feel it’s not right for what you want to do, then don’t take it. It’s your art. Let your vision for it be your guide.
If you’re unsure, it can be helpful to ask someone who’s opinion you’ve come to trust. It may be that they’ve offered you advice in the past that at first you didn’t agree with but ultimately decided to follow. After the same person has given you advice you’ve followed (or you trust them because you’ve watched their tutorials or read a book from them), if that person gives you feedback, you’re more likely to take it in the future even if you don’t think you agree with it because they haven’t steered you wrong before. (Similarly, someone who keeps giving you bad advice that ignores any stated intent you provide is likely someone you’ll start to ignore when they give you any advice.)
My point is, just as me, Kent, and others have given you advice throughout the course, keep seeking advice on your future projects. Advice taken can only make your work stronger, both on the piece you’re working on as well as future pieces.
And don’t limit yourself to “just” Blender artists or even CG artists. A lot of the streamers I watch on Twitch don’t even use Blender, but I like watching them for style, composition, color theory, techniques, and more. And I think I said something on one of the posts this month about wood grain. Guess what? That tidbit came from someone that works in wood and has influenced the way I’ve modeled and textured everything I’ve done since learning that. In fact, seeing how things are made in the “real world” can give you ideas on how to model them in CG.
So in addition to using plenty of references, make sure you’re also getting lots of feedback to make your work better!
January 30, 2018 at 9:37 am #32861For being the least time spent on a submission, it’s still a pretty cool image! I like the exaggeration of the waves, and the paper boat of course. I’ll give a B+ just because I know you can do more 😎
“I got to use 3D modeling for my first time this week at my job to show a mock up of a live event space, and we landed the job!”
How cool is this?! Congrats on using 3D for the first time at work and for landing the job! Pretty good reason to not have much time for the homework. I look forward to seeing you in March, @nathangarduno 🤘
January 30, 2018 at 9:53 am #32862“This creature”…you mean Charmander?! Unless I’m blind, I recognized him immediately. Which is a kudos to your sculpting. A-quality work this week @panagiotis156 👍
January 30, 2018 at 1:35 pm #32863Thanks for the feedback. Honestly, I just followed the lesson plan and I’m taking my time. For the past couple of months, I’ve focused heavily on form drawing so mixing it with sculpting is helping a ton. Thanks to the videos, tips and guidance provided through this course and Kent, it’s made the learning process so much easier!!!
January 30, 2018 at 8:35 pm #32864BC1-1801 Week 4 Homework Submission
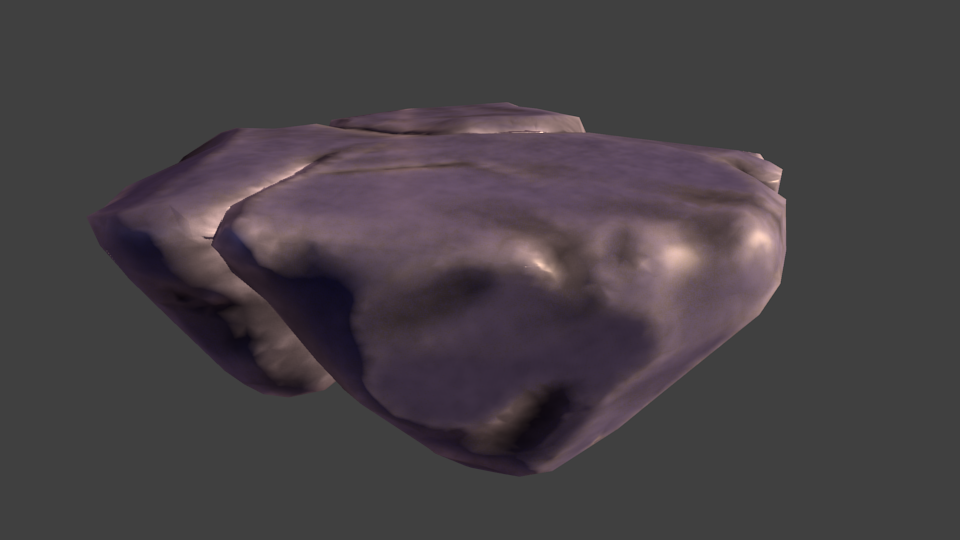
For this week’s homework I chose to practice sculpting. I first started a rock sculpture.
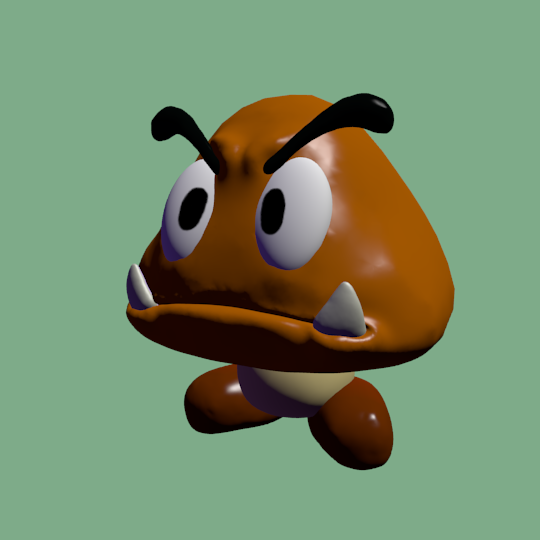
Something that could be used as a floating platform in a game. From this sculpture, I created a low poly mesh, with baked normal maps and AO. The end result was kinda muddy, so I was not really happy with it.After that I tried sculpting a goomba. To get the really sharp transitions between the body parts,
I sculpted each body part as a separate piece.I really feel that I have improved my sculpting a bit by doing this exercise. The different sculpting tools start to make more sense and I start to get a feeling which brush to use to get the effect I need.
Below are pictures of the low poly rock and the goomba.

-
AuthorPosts


- The topic ‘[ENDED] BC1-1801 – January Class Homepage – Getting Started with 3D Modeling & Blender’ is closed to new replies.