[ENDED] BC3-1806 – June 2018 Class Homepage – Vehicle Modeling with Blender

Forum Archive [ENDED] BC3-1806 – June 2018 Class Homepage – Vehicle Modeling with Blender

Viewing 15 posts - 856 through 870 (of 1,277 total)
  • Author
    Posts
  • #35911
    William Miller
    Participant

      Ignore my pinching problem; I fixed it.

      #35912
      Aaron Rudderham
      Participant

        I don’t suppose we have any classic car nuts in here who can tell me what this thing is?

        Kinda bums me that I can’t seem to find any good textures for the fuel gauge or the speedometer either, makes me wish I was better in PS.

        #35913
        William Miller
        Participant

          Is there any way to randomly distribute dials, switches, and buttons across the “console” (Is that what it should be called?) without using a particle system?  Whenever I use a particle system, the rotation isn’t properly aligned.

          #35914
          William Miller
          Participant

            I don’t want to do it by hand because it’s large and has a curved surface.

            #35915
            Aaron Rudderham
            Participant

              @williamatics To my – admittedly limited – knowledge, no. The closest thing I can think of is using group instancing like the gauges in the HSM Fundamentals, but that’s still a massive stretch considering you’d have to still place them manually, you just save time with duplicating. You have any idea @tbrbn?

              #35916
              silentheart00
              Participant

                @thecabbagedetective Trip tracker?  Like how many miles in a trip you took to the store and back?

                #35917
                silentheart00
                Participant

                  Getting there.  Must… work… faster….

                  #35918
                  Jake Korosi
                  Participant

                    @silentheart00 Now that’s looking sharp. 

                    #35919
                    Jake Korosi
                    Participant

                      @thecabbagedetective I think I see the “PRND12” indication at the top.  As for the rest, not sure.  Maybe one of those “driver information center” gadgets that shows when you have a door open.  Or a trip computer like silentheart says.

                      I guess one reason its hard to find good textures for your gauges and such is that I imagine few Rolls owners work on their own cars, so the aftermarket is pretty small.  Could be wrong though.

                      #35920
                      Morten Fjellheim
                      Participant

                        Question: Do i have to use the the exterior model to make the intyerior, or can i seperate it and make a new model?

                        #35921
                        mrdojo
                        Participant

                          I am slowly getting there. Underestimated the trunk part a bit as it had allot of difficult holes to model in.
                          Already planned the inside interior out but I first want to tackle the bottum of the car. Been ill the last week but working on this has been my guilty pleasure 😛 good to see everyone is still at it!

                          #35922
                          Thibaut Bourbon
                          Participant

                            @williamatics Here’s a way to solve your issue using particles system, or rather hair particles system:
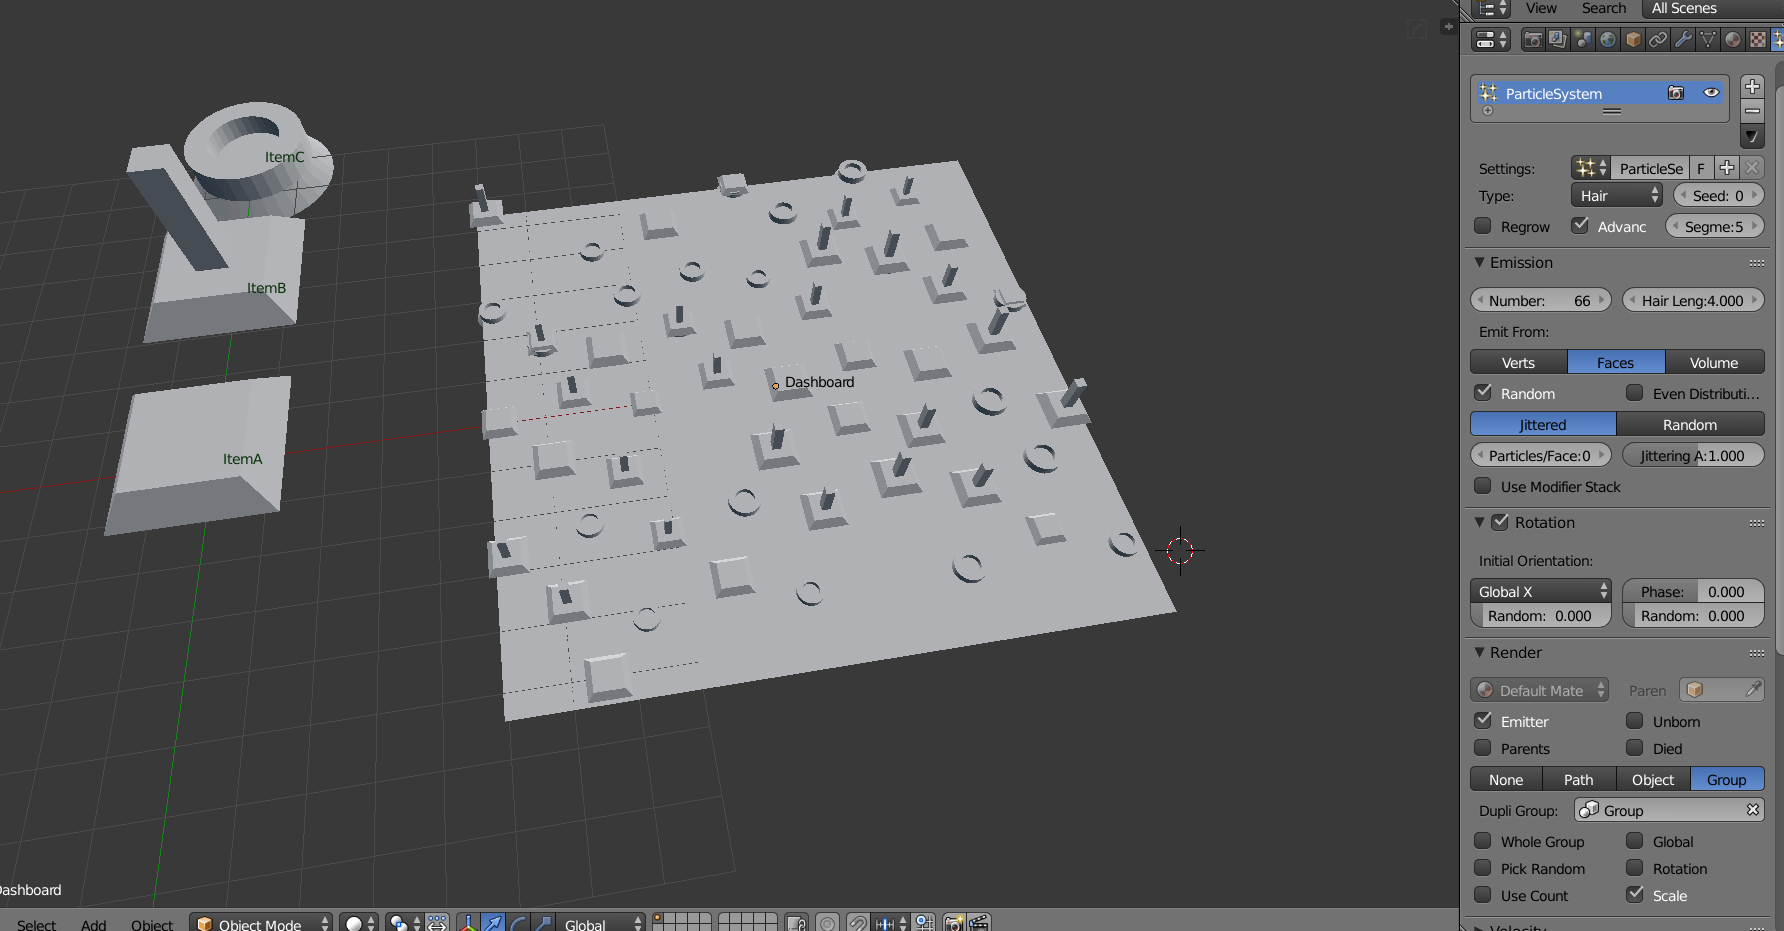
                            You first have to model some buttons,switch, gauge and so on (namely ItemA,B and C on the image above) and create a Group (ctrl+G) in which they all belong. Then on your dashboard (here I used a plane that I subdivided with W so I can get mort verts) you create a Hair particle system. Don’t forget to activate “Advanced” so you get access to the rotation sub-menu. Use the Group render mode and adjust the rotation as needed (in my case, Global X, depends on your object orientation).
                            You will then have to play with the emission setup to get a result you like: the difficulty is not to get a dashboard that looks too random, as if someone just threw stuff on it. Good luck!

                            Edit: i read too quick! You want to avoid particles, my bad. If you have your assets ready, simply duplicate them (shift D or Alt-D for instancing) and use the Ctrl button to snap them. You need to activate the “Align Rotation” as well.

                            #35923
                            Jeremy Pouillot
                            Participant

                              @arev I have 147 objects on my car, so yes you can separate. At first I made the exterior and then separate pieces to keep base shape and work on each particular parts.

                              #35924
                              William Miller
                              Participant

                                @tbrbn That’s what I was afraid of.  My submission is going to be late.

                                #35925
                                Thibaut Bourbon
                                Participant

                                  @williamatics Could you use a texture as a displacement map ? For example taking a dashboard image, turn it into greyscale values and use the microdisplacement tool? Might be overdrivensolution though, perhaps a simple image would do the trick.
                                  To be honest the “traditionnal” kitbashing technique is not that much time consuming once you do it a couple of time you can even instantiate groups of assets rather than individual assets. Just make sure it doesn’t look too repetitive then.

                                Viewing 15 posts - 856 through 870 (of 1,277 total)
                                • The topic ‘[ENDED] BC3-1806 – June 2018 Class Homepage – Vehicle Modeling with Blender’ is closed to new replies.