
BC4-1810 Homework, Katerina Novakova
Forum Archive › BC4-1810 Homework, Katerina Novakova
- This topic has 74 replies, 13 voices, and was last updated 7 years, 10 months ago by
Katerina Novakova.
-
AuthorPosts
-
October 3, 2018 at 7:52 am #10048
My homework thread for the October 2018 Class.
Week 1:
- Original toy truck & bedroom
- Reworked bedroom
- Reworked toy truck
- (Bonus): Paper crane (lighting match 0)
Week 2:
- Fiat 500
- Lighting match – Mortars (plus the lighting evolution gif)
Week 3:
Week 4:
October 3, 2018 at 8:14 am #42478Welcome back to class Kate, looking forward to your shading and lighting magic! 😄
October 3, 2018 at 8:18 am #42479@smurfmier1985 Thank you, I’m looking forward to seeing your creations as well. 🙂
October 3, 2018 at 8:43 am #42480Week 1 – Act 1
I’m normally not a big fan of posting in-progress images before a project is finished, but I think the structure of this class will allow me to show my completed mini-projects during the week.
Since I did this week’s exercises in the past, I thought I’d revisit the scenes and shade / light them in 2.8. So, my current plan is:
- Light the bedroom in other than day/night style (I’m thinking dawn/dusk)
- Shade the truck while also using texture painting / procedural materials (in Blender, not SP)
- Create a simple object and do my first light-matching exercise (I’ve never done those before, so the sooner I start, the better)
Here are links for my previously submitted exercises:
October 3, 2018 at 11:35 am #42481@shiennar Yep, your exercises look good. Not much to critique there. Looking forward to what you can do now!
October 3, 2018 at 12:20 pm #42482@shiennar The exercises are looking nice to me, looking forward to seeing how you blow my mind this time!
October 3, 2018 at 12:33 pm #42483Week 1 – Act 2
For the bedroom scene I chose “pink sunrise” HDR (from HDR Haven) as a basis. I turned its strength way down and added three coloured area lamps with low energies. I used fairly saturated colours to imitate the sky. In Filmic settings I went for my favourite medium high contrast, and in the Render tab I enabled ambient occlusion and bloom and played with the values until I got what I thought was going to be my final.
Luckily, I asked for a second opinion and it turned out I forgot to enable the contact shadows (it is available on lamps in the Data tab). That partially solved my issue with the corner of the room – even though it still looks a bit unnatural. I had to find a compromise between colour and shadow and this seemed to be it.
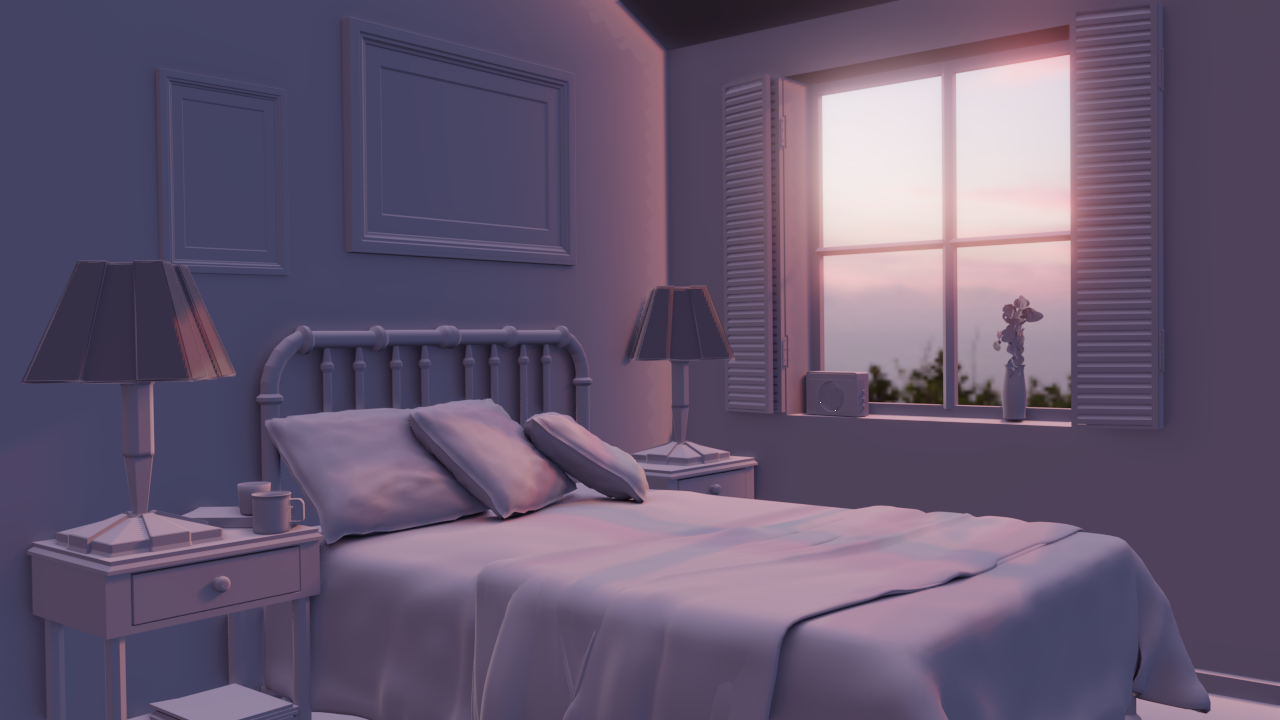 October 3, 2018 at 1:04 pm #42484
@shiennar I love the mood, very dreamy 😊
October 3, 2018 at 2:16 pm #42485@shiennar Nice. Feels dream-like. Bummer about the corner of the room, though. Hopefully we can find a solution to help that corner out.
October 3, 2018 at 4:28 pm #42486@shiennar First, I highly approve of your decision to redo these exercises with 2.8 + Eevee 👍
I wonder if you could simply add a solidify modifier to the room object and give it a slight bit of thickness outward (not visible in camera). I’ve seen light bleed in corners like this before and remember it having to do with paper-thin geometry.
Overall this Eevee version is looking pretty great! Certainly very appealing color palette. Technically I’m seeing Eevee’s shortcomings with the lack of global illumination. Eevee does have a GI feature. Perhaps implementing that could introduce more GI-type gradients?
October 3, 2018 at 4:38 pm #42487@theluthier Thank you. 🙂 I did try adding the Solidify modifier, but even when I applied it and recalculated normals, there was no change. The corner is lit by the lamps that are pointing through the window, not by the HDR. But there is a weird thing with the lamps – the light doesn’t change when I rotate them on the Z axis, only when I move them around. Almost as if the direction of the light beam was ignored. And regarding the global illumination – is that an option I need to turn on somewhere?
October 3, 2018 at 4:55 pm #42488@shiennar Ahh bummer about the room thickness not solving it. And my apologies, it’s not called “Global Illumination”. Look at the Indirect Lighting options. I’ll go over it this coming week in the stream but for the moment try youtubing “eevee indirect lighting” for basic setup.
October 4, 2018 at 3:50 am #42489@shiennar I think I kinda solved this problem with additional geometry around the corners. It’s mostly like using solidify, but a more manual way. You can check my blend file (up to date version in my homework thread), maybe it’ll give you some thoughts.
.
October 5, 2018 at 4:00 pm #42490Week 1 – Act 3
First of all, thank you, @theluthier and @nekronavt, for your tips – I haven’t got round to check them yet, but I will try my best to have a look before the next stream.
I was working on the toy truck revamp these last two days. I thought I’d try out the changes that were introduced in texture painting and paint myself some roughness and grunge maps. First, I created two grunge maps in Krita (by flailing an unspecified number of texture brushes around until the canvas started to resemble stains and scratches. If you squinted a lot.)
Then in texture paint mode I duplicated the draw brush twice and set up one texture for each copy. With random tiling enabled the brushes worked pretty decently. And then the texture-fu fight began. Eevee seems to have an issue when loading textures. So every time Blender crashed (which was pretty often) I had to toggle “Use Nodes” on every material to get the textures back. Then there was the thing with “Save all images”. While I greatly appreciate the thought behind it, it only seems to work if you a) manually save your texture first and b) your textures are on the same folder level as your project. Mine weren’t (I put them into a folder one level down) and I ended up with a couple of textures not saved. And then it was just minor annoyances. Textures registering as missing even if you had paint slot selected, changes not refreshing in viewport until you zoomed in and out… On the whole I’d wait for beta at least before trying this again.
So, here are the renders. The first one is clean, without textures, the second one has the roughness and grunge applied. Oh, and I forgot to say that I reworked the table material and compositor effects because… why not. 🙂


EDIT: And here is a Cycles render for comparison
 October 5, 2018 at 5:17 pm #42491
@shiennar really nice work both on the bedroom as toy truck. I love how the lightning turns out in the bedroom a really nice render 😀 the toy truck also is amazing done
-
AuthorPosts


- The topic ‘BC4-1810 Homework, Katerina Novakova’ is closed to new replies.