
Collab2021 – WIP – createtaiwan
Forum Archive › Collab2021 – WIP – createtaiwan
- This topic has 69 replies, 10 voices, and was last updated 5 years, 4 months ago by
Dave Hudson.
-
AuthorPosts
-
April 13, 2021 at 11:40 pm #65100
Sorry… Just saw this. I guess it’s a moot point now!
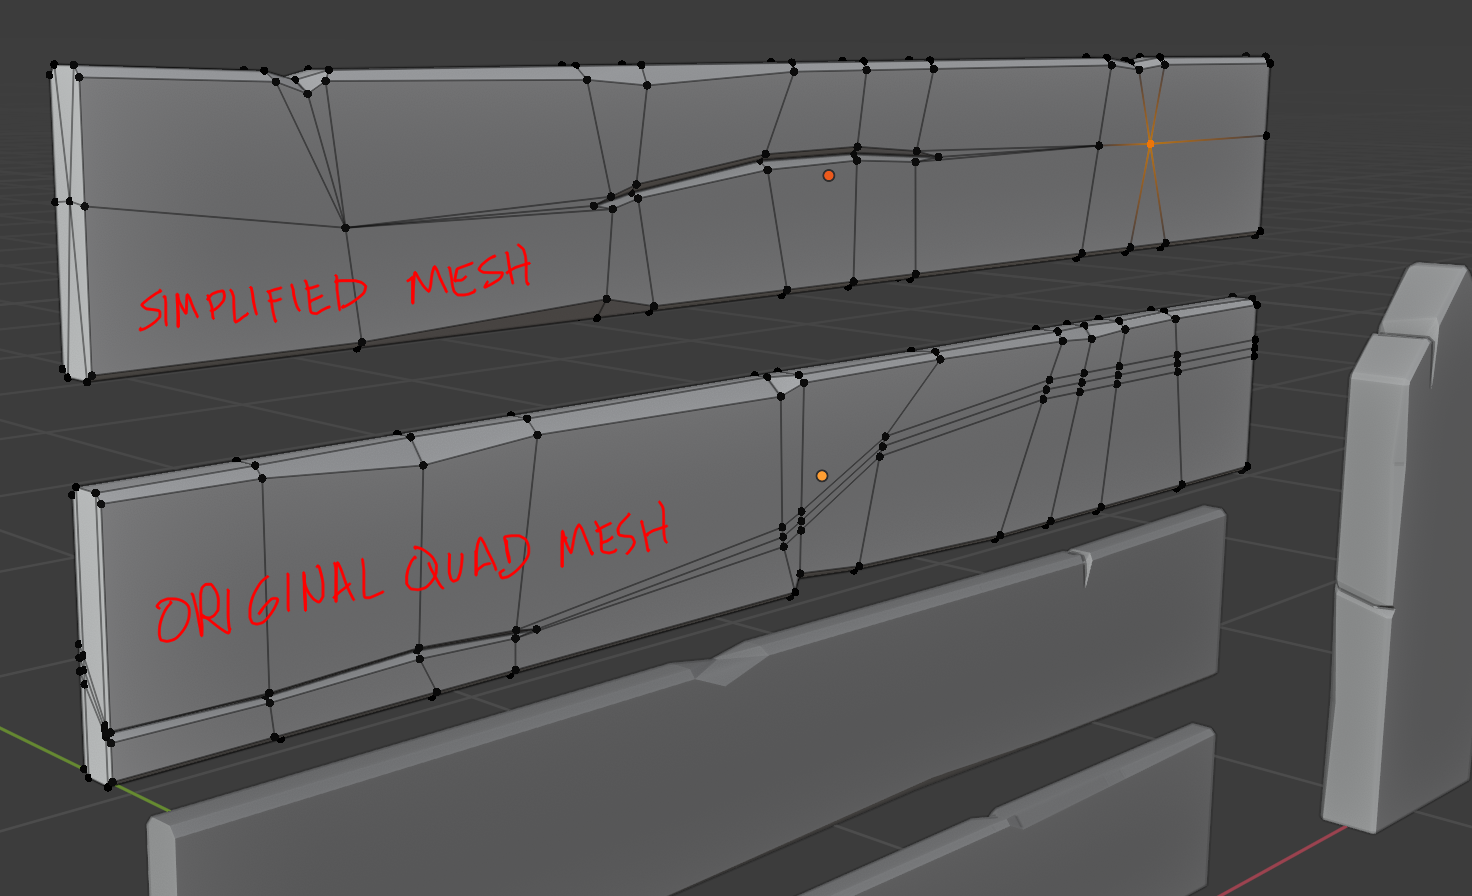
April 13, 2021 at 11:50 pm #65101@luthier @duerer – So, after last night’s Livestream I am making a few changes to my file before jumping into the sculpting and I just wanted to get some feedback on whether I am going in the right direction.
- I separated my original wood pieces (there are 9) and put all the linked duplicates that I arranged in the space to form the actual fence into a separate collection to keep things clear.
- I moved the original “lego” pieces to the middle of the world space (by clearing the location and rotation info).
- I am simplifying the mesh (I had originally done it all in quads because, well, quads rock) and using more triangles to reduce unnecessary vertices.
- I will then duplicate the 9 pieces into a new collection called Fence_High and add the MultiRes Modifier and start the sculpting process.
I assume that next week when we bake the MultiRes mesh onto the texture of the low poly pieces, that will automatically propagate to all the linked duplicates that make up the actual fence?
 April 14, 2021 at 12:54 am #65102
One more thing… should I be creating holding edges around the major cracks in the wood?
April 14, 2021 at 1:17 am #65103@createtaiwan Good question. @theluthier 👆
April 14, 2021 at 3:02 am #65104I followed the treasure chest tutorial, they use Mark sharp, without reinforcement. I imagine that in order to put multires on it you will need to reinforce the cracks unless you don’t use it and opt for dynotopo.
April 14, 2021 at 3:04 am #65105I’m planning to use the Multires as it was demonstrated in the livestream.
April 14, 2021 at 7:57 am #65106One more thing… should I be creating holding edges around the major cracks in the wood?
I “wood” say yes….
When Kent added the holding edges with the bevel tool he described it as a “dirty subsurf modeling” method for only the edges that understandably would need to be harder and reinforced. [CRTL+B] with a little bit of offset (EX.0.0006) and a segment of (3.)
He tested it with the Subsurf modifier just to see how it will smooth, then removed the subsurface modifier in order to add the multires. He then added the Multires and set the level to (5.) You can also sharpen edges in Sculpt Mode with the Crease Brush [SHIFT+C], but it is easier to create those sharp edges with the bevel tool.
April 14, 2021 at 10:21 pm #65107I concur with @ullreym that the “dirty subsurf” method of beveling everything is a decent way to get to sculpt mode faster.
One thing to keep in mind once you’re done adding sculpt accents: All the little nicks and cuts you modeled in the base mesh (as I did in the treasure chest course) – those could possible be removed in the final model for each fence piece. This would optimize the geometry where such details would only live in the normal map. Food for thought!
April 14, 2021 at 10:37 pm #65108I see…. so keep a Lo rez model for the baked maps to attach to. Then make a medium rez model based on the Lo rez to prepare for a high rez sculpt to produce said maps. Then at some point lose the medium and high rez models when you don’t need them anymore.
April 14, 2021 at 10:39 pm #65109Would that apply only to cuts and nicks that do not show up in the silhouette?
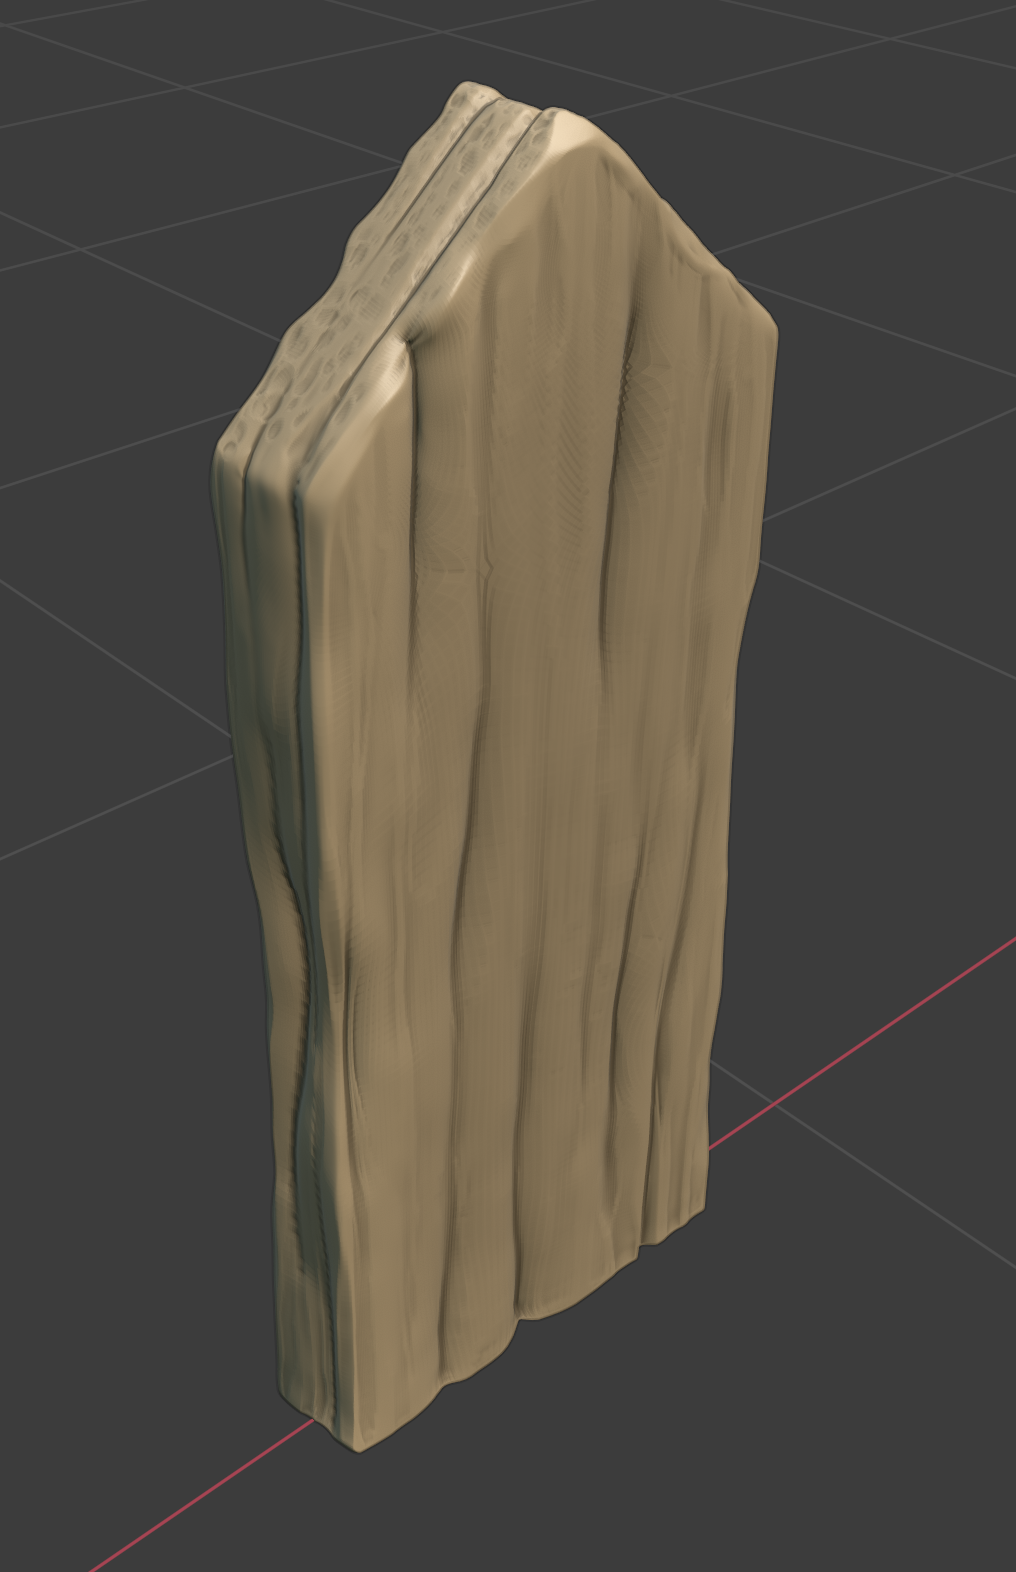
April 15, 2021 at 12:08 am #65110First attempt at sculpting wood!
 April 15, 2021 at 2:43 am #65111
👆👆 @createtaiwan Yes, I believe that that would only apply to anything that doesn’t affect the objects silhouette.
The sculpted wood looks good, although I don’t think that there would necessarily be that much wood grain on the shorter sides of a fence post. 🤔 👍
April 15, 2021 at 3:29 am #65112April 15, 2021 at 7:42 am #65113I have already cleared the sculpting and will start again after watching Kent’s upcoming livestream. It looks too much like melted cheese and not wood. I think the cracks need to have harder, finer edges and I’m not sure what tool/brush would work best to achieve that look.
April 15, 2021 at 10:20 am #65114I’m not sure what tool/brush would work best to achieve that look.
@createtaiwan I think, it’s the “Scrape Brush” used by Kent @theluthier here (already in minute 1; Kent renamed the brush to “Carve”) with the “View Plane” set as “Sculpt Plane” which has to be locked.
In Blender 2.9x check “Use Original Normal” for the locking:
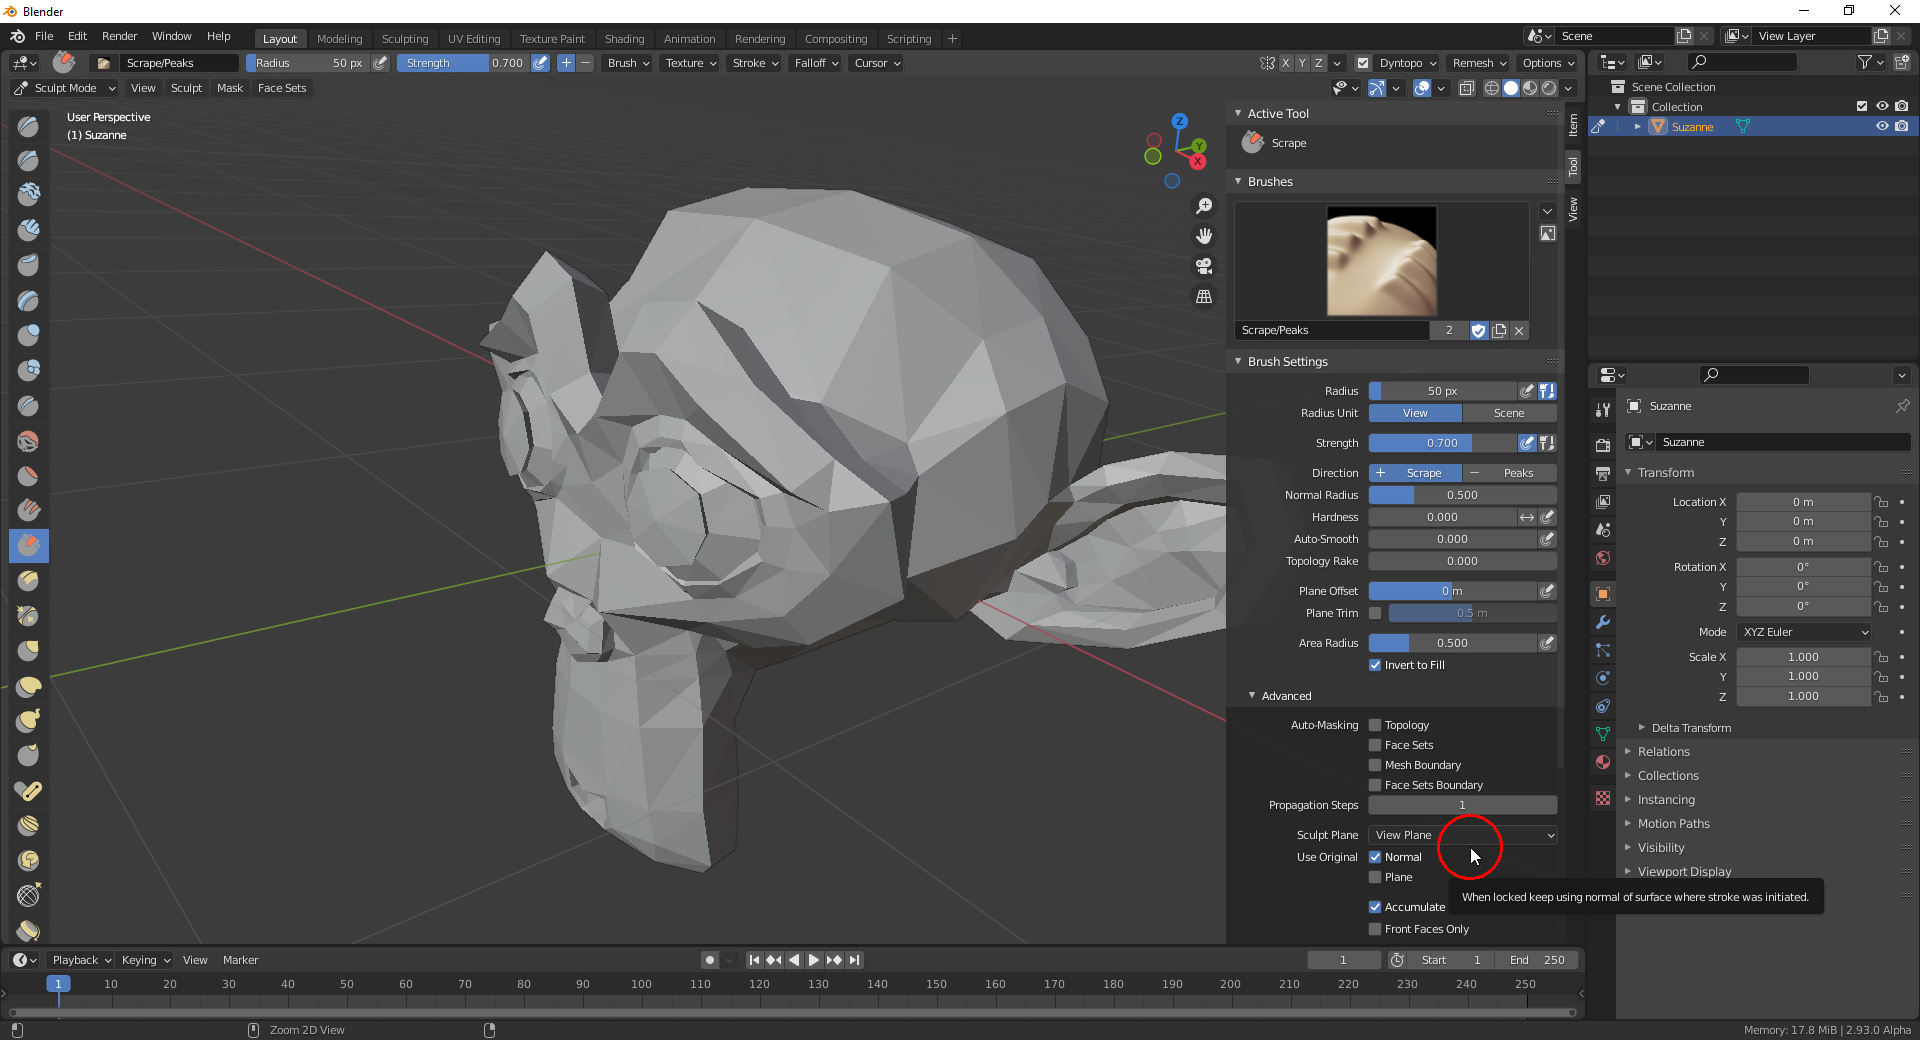
What these settings do, as far as I understand it, is that the brush projects the mesh along the “Face Normal” that the brush detects directly when the stroke is started to a plane parallel to your screen surface in the 3D scene running through the surface point currently under your brush. You should also check “Use Original Plane” if you don’t want to reduce your mesh to nothing 😉😁! With the last mentioned option checked, the distance from your viewpoint to the surface point where your stroke starts is measured and only mesh parts up to a plane parallel to your screen and running through that “stroke start point” (my naming 😉) are affected. You need that option in your use case.
-
AuthorPosts


- The topic ‘Collab2021 – WIP – createtaiwan’ is closed to new replies.