
Collab 2020: Modeling Heavy Equipment (Backhoe)
Forum Archive › Collab 2020: Modeling Heavy Equipment (Backhoe)
- This topic has 1,439 replies, 27 voices, and was last updated 4 years, 1 month ago by
Omar Domenech.
-
AuthorPosts
-
May 11, 2020 at 9:33 pm #54227
HI Shawn,
Sorry if any of this is off the mark – I haven’t read the full thread so I’m a little confused as to what’s going on haha.
But I have flagged it with Kent that I think we need to rig this project when it’s done 😉
You are on the right track (pun not intended) but you can keep everything inside the 1 armature rather than using an armature and 2 empties.
Swap your empties for bones and then parent them in the same way (rather than copy loc constraints). Everything else will be the same – except you will probably need to avoid parenting one control to the other (as you are likely to get a dependency cycle – but I will have to take a closer look at things to be sure, I’m just thinking out loud at the moment). If you do get a dependency cycle you can then unparent and use the copy loc.
Keeping all the controls inside the 1 armature will make it useable for animation 😉
As for the stretching part – I’m not exactly sure how it needs to work but try the stretch to constraint and turn off the volume preservation so it stretches the geo along the length of the bone. (otherwise you will get cartoony S&S)
The stretch to is very similar to the damped track but it also stretches.
May 11, 2020 at 10:14 pm #54228Sorry if any of this is off the mark – I haven’t read the full thread so I’m a little confused as to what’s going on haha.
But I have flagged it with Kent that I think we need to rig this project when it’s done 😉
YESSS
Ladies and gents, the game is afoot.
Or…it shall be eventually. One thing at a time I suppose. 😀
May 12, 2020 at 6:43 am #54229@jakeblended looks like a perfect fit. My changes to the height of the rails are not included in my submission either, I think it may be a bit late now to be included. But at least we are making progress, I’m sure @theluthier will be aware of the progress being made by everyone.
@ketre found an image that may help with the cab as far as height in relation to the fenders.
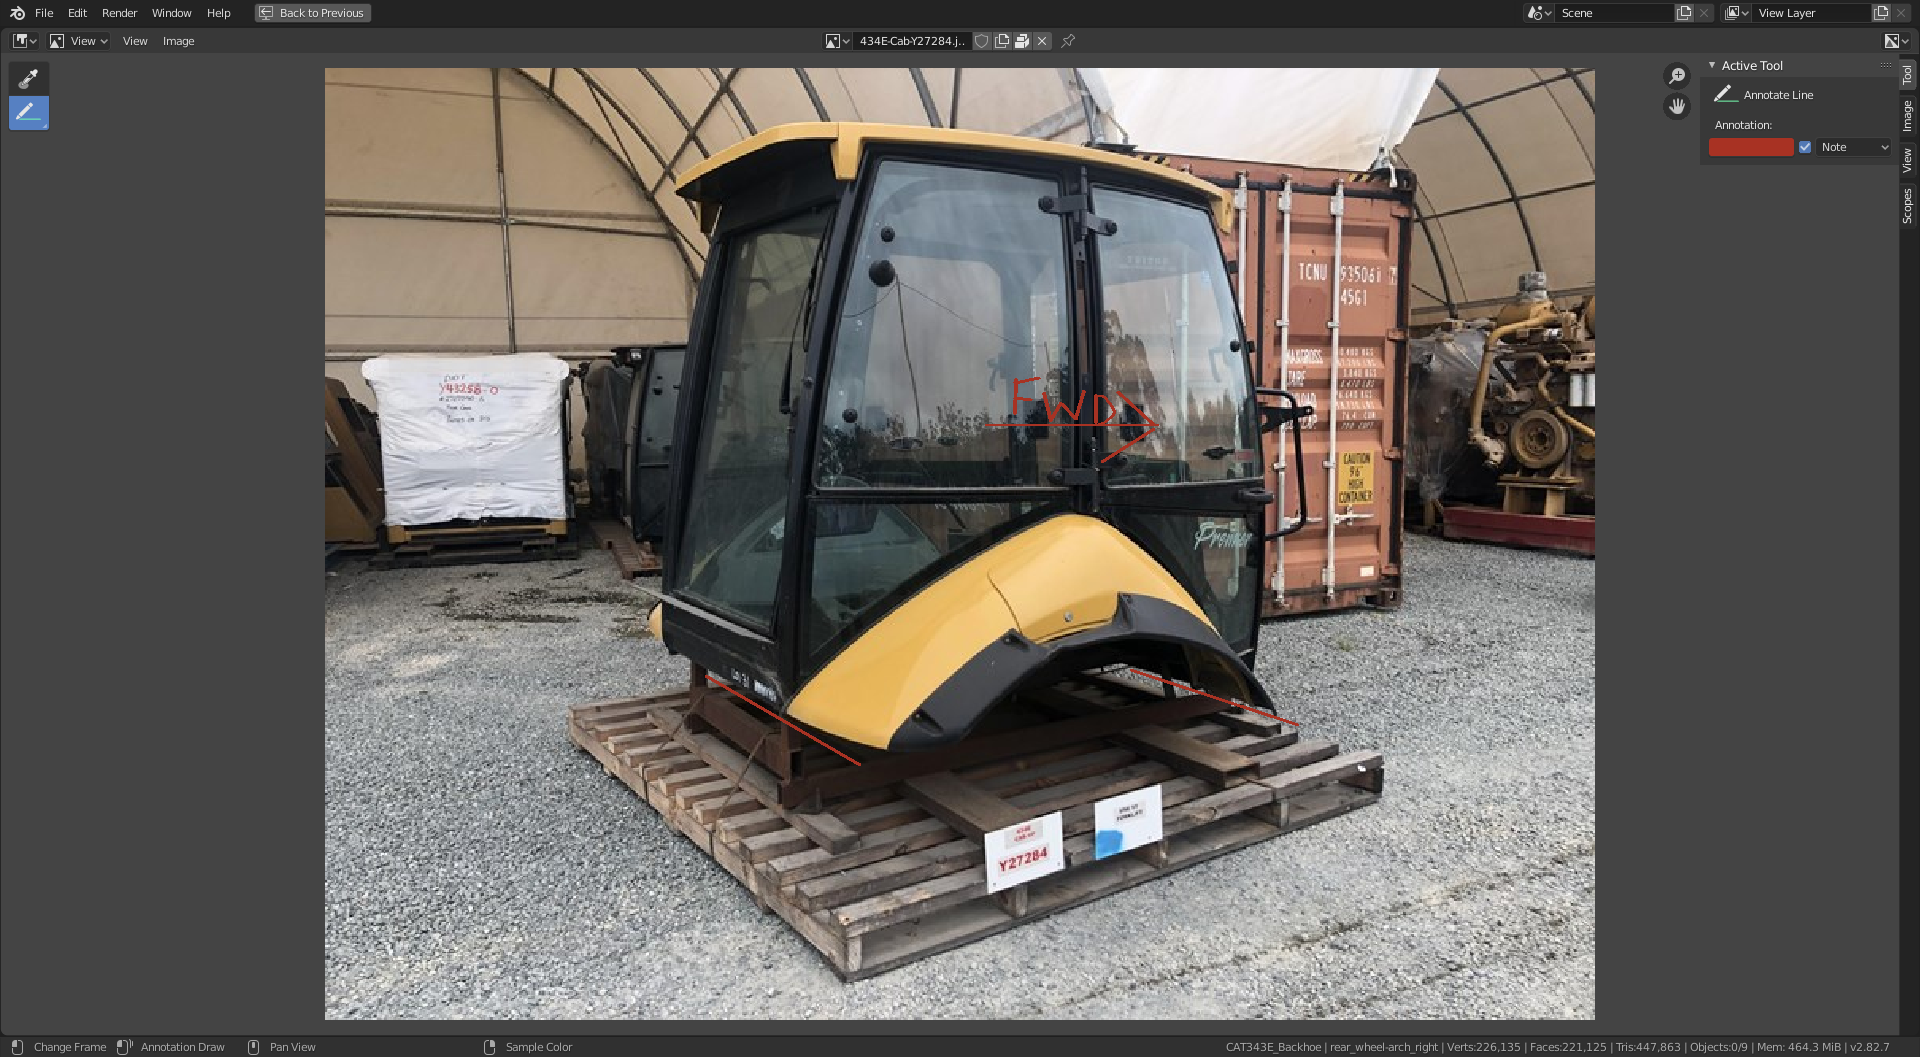
As you can see the base of the cab lines up with the bottom of the fenders. The front edge of the fender is lower than the rear as you would be able to see from my model of the fenders, this weeks submission will be part of the next updated file and will probably help you more. As far as we can tell from this image the Cab is the same length as the fenders, maybe slightly bigger at the front, but I think the Cab curves in a bit at the bottom. The metal frame at the bottom is probably custom made for transportation of this part and not actually part of the cab.
Here’s the LINK to the site where I found this image, maybe useful for other parts, but I haven’t searched the site so may not find anything of use.
There actually based in AUS, so if @waylow is not to busy and wants to join our project, a tape measure could be useful.
Just an Idea, but maybe Dixy can give a lesson on rigging and animating this DOG at a later stage, as it has been mentioned previously with the pistons, with constraints and bones and empties and rigs and rotation and everything else. I’m confident in @theluthier skills, but @waylow knows his stuff when it comes to animating. I have been on the Animation Bootcamp course recently, and I have learnt a great deal from Dixy, and realise how hard animating is. Bootcamp is probably an understatement, but it is a fantastic course.
I for one am really into this collaboration project and think we can take it further and have a whole fleet of construction toys all rigged and animated, is it showing that I don’t want it to end. ha ha.
May 12, 2020 at 8:15 am #54230So was that you in the video @blanchsb , haha
Perfect, I would presume the empties could be parented to the part it is attached to.
3 Align with the Chassis on the other end.
the changes from @adrian2301 for the chassis.
I have worked hard on trying to work with everyone’s parts to get the chassis to a point now where I don’t anticipate having to make any more changes to the chassis, apart from maybe detailing, but the position of the key points such as where the loader arm attaches the chassis, I’m confident won’t change.
I’m still a bit confused on the part you talk about stretching.
I’ve borrowed your image, I’ll give it back I promise,

Ok Consider Piston 1 is your example in the video, point 1 is attached to the chassis and location is fixed but rotation is free. Also point 2 has a fixed location in relation to the main arm. So if the empties in your example video were to be parented to the chassis and arm respectively, when lifting the main arm, which is fixed at point 10 to the chassis, piston 1 would extend and rotate at point 1 and 2, perfect so far in you video. Piston 2 has fixed LOC at Point 5 and 6 in respect to part 2 and 3. Piston 2 when extended pushes part 3 which then rotates the bucket at the pivot point 8. Part 4 is there to stop it just flopping around.Part 1 and 2 are there to stop piston 2 moving in the wrong direction. So imagine the main arm raising up at the bucket end and pivoted at point 10, Part 1,2,3 and 4 will all move as they are all connected. All the pivot points from 1 to 11 will be rotating at different degrees and directions, while the main arm is raising but will always be constrained on the location to the respective part. Point 1 to the chassis, Point 2 to the main arm etc. etc. Where the piston is free to extend as in your example video, the only consideration going forward would be a limit to how far it extends and retracts. This I would suggest be controlled by limiting the rotation of point 10 for piston 1 and point 8 for piston 2. I’m going to stop there as I’m beginning to confuse myself.
But I’m not sure where stretching will be necessary.
May 12, 2020 at 8:26 am #54231Indeed I’m regularly reading through this thread. As well as I can…I know I’m not the only one getting confused in here lol 😅

The cab seems to be a particularly tricky piece of the backhoe. If there’s time today I’d like to work on the cab during the stream.
Just an Idea, but maybe Dixy can give a lesson on rigging and animating this DOG at a later stage
He’s already told me he wants to rig it when we’re done!
May 12, 2020 at 8:37 am #54232Yeah the cab is a bit like the chassis, you can’t see where it begins and ends, But hopefully the image above helps.
Excellent that Dixy, @waylow , want’s to rig it. Do you think he might want to be apart of a live stream or just upload a course? The reason I ask is I’m learning more about animation and rigging but most of the courses are from previous versions of Blender, pre 2.8, so it can be quiet hard to learn such a complex and difficult subject.
May 12, 2020 at 9:26 am #54233 @adrian2301 the collaboratoon is awesome and so much fun @theluthier thank you, Ive been tearing my hair out over the cab…May 12, 2020 at 9:35 am #54234
Oh wow, all your parts look so great, I feel my step and battery box are so lame now . I go away for a moment and there’s just too much to read, so I’ll just imagine it all goes “I present my piece!, wow, very nice, any advice? yes! maybe like this!, thanks! you all rock!…. and I’m done, good job everyone.
May 12, 2020 at 11:22 am #54235The stretching is only necessary because my parts’ pivot points at the Chassis connection are not “perfectly” going into the holes that are there. They are slightly off when you zoom in (circles 1, 10, 11) I would only need to stretch “Part 1” and “Part 2” to get them to line up.
“Piston 1” is a piston so I can move it and the outer and inner will slide just fine since they are two parts. “Part 1” and “Part 2” are single parts and currently will probably not line up exactly on both locations (loader bucket connection and chassis connections). So I would have to go into object mode and rotate to “eye-ball” hopefully something close, then go into edit mode and stretch the edges, then go back into object mode and rotate again, and rinse and repeat. Then do the same for the next part. Have the objects point at each other is really what I needed to be honest.
I am trying to think outside the “we’ll just edit the meshes until they conform to the change and remodel if necessary” box. If this were a production pipeline and let’s say you did need to move 3 inches back, how would I roll with those new changes? Constraints seems to help A LOT to overcome this hurdle.
May 12, 2020 at 11:25 am #54236Yeah that was my sultry voice @adrian2301 I was not trying to imply that you were making drastic changes or being careless. The chassis is looking awesome. I just didn’t have a chassis to “line up with” when I first made the loader arm assembly. So now that I have put a lot of work into it and want to “mate them up” AND not deform my straight parts and the Engineer-in-me wants it to line up exactly haha.
May 12, 2020 at 11:27 am #54237With the Copy Location AND Damped Track Constraint I can totally line up my straight parts and manually stretch them along their local axis in edit mode until they go where they need to go. That constraint workflow completely makes my life A LOT easier.
May 12, 2020 at 12:02 pm #54238@blanchsb sorry if it came across wrong but I hadn’t thought you implied anything, I am happy to make adjustments as and when. Not having any clear images of the chassis, I am modelling the chassis based on other parts and the images only as a guide. Now we are all on a more detailing stage the process is getting easier for me. With the next update of the main file from @theluthier this week I will be able to move the location of the holes slightly to match your parts. The engineer-in-you would probably agree that if we had detailed drawings with measurements like circumferences of a hole or the precise location of said hole. I hope this clears that up, I was assuming everything was all aligned perfectly. Now I understand the ‘stretching’ issue we can hopefully overcome this by moving the holes to line up.
May 12, 2020 at 12:12 pm #54239@adrian2301 to be honest I feel like it would be my job to line my parts up to your chassis since my parts are quite movable. Leave yours where they are and I’ll make the fix for the next submission round. It is really a fine and challenging exercise for me. I’m not complaining at all because I am learning sooo much that I wouldn’t on my own. This team interaction is quite fun.
Maybe @pfbourassa would need to line his part up to mine since the bucket sits at the end and relies on the arms for movement.
I think this makes the most sense to me.
May 12, 2020 at 12:16 pm #54240I’m getting excited for the stream today. Going to hop on the waiting room now if it lets me.
May 12, 2020 at 12:16 pm #54241Yeah, I tried to keep my holes flexible. They are all cut into flat sheets, so it’s easier to slide around than yours where the whole piece kind of revolves around the holes.
-
AuthorPosts


- The topic ‘Collab 2020: Modeling Heavy Equipment (Backhoe)’ is closed to new replies.