
Robot RIG strange behaviour
Forum Archive › Robot RIG strange behaviour
- This topic has 15 replies, 4 voices, and was last updated 8 years, 10 months ago by
pieriko.
-
AuthorPosts
-
September 24, 2017 at 10:03 am #9187
I have been trying to rig a robot for export to unity for quite some time now. My rig is complete but it behaves strangely. Here is the robot:
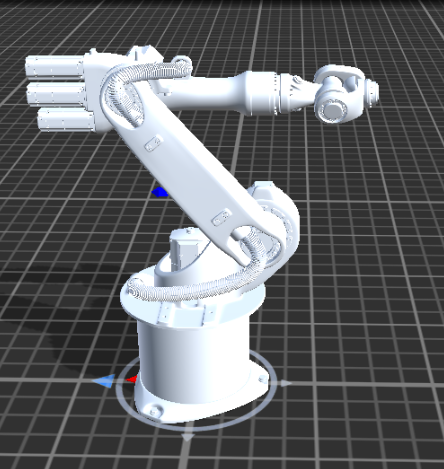
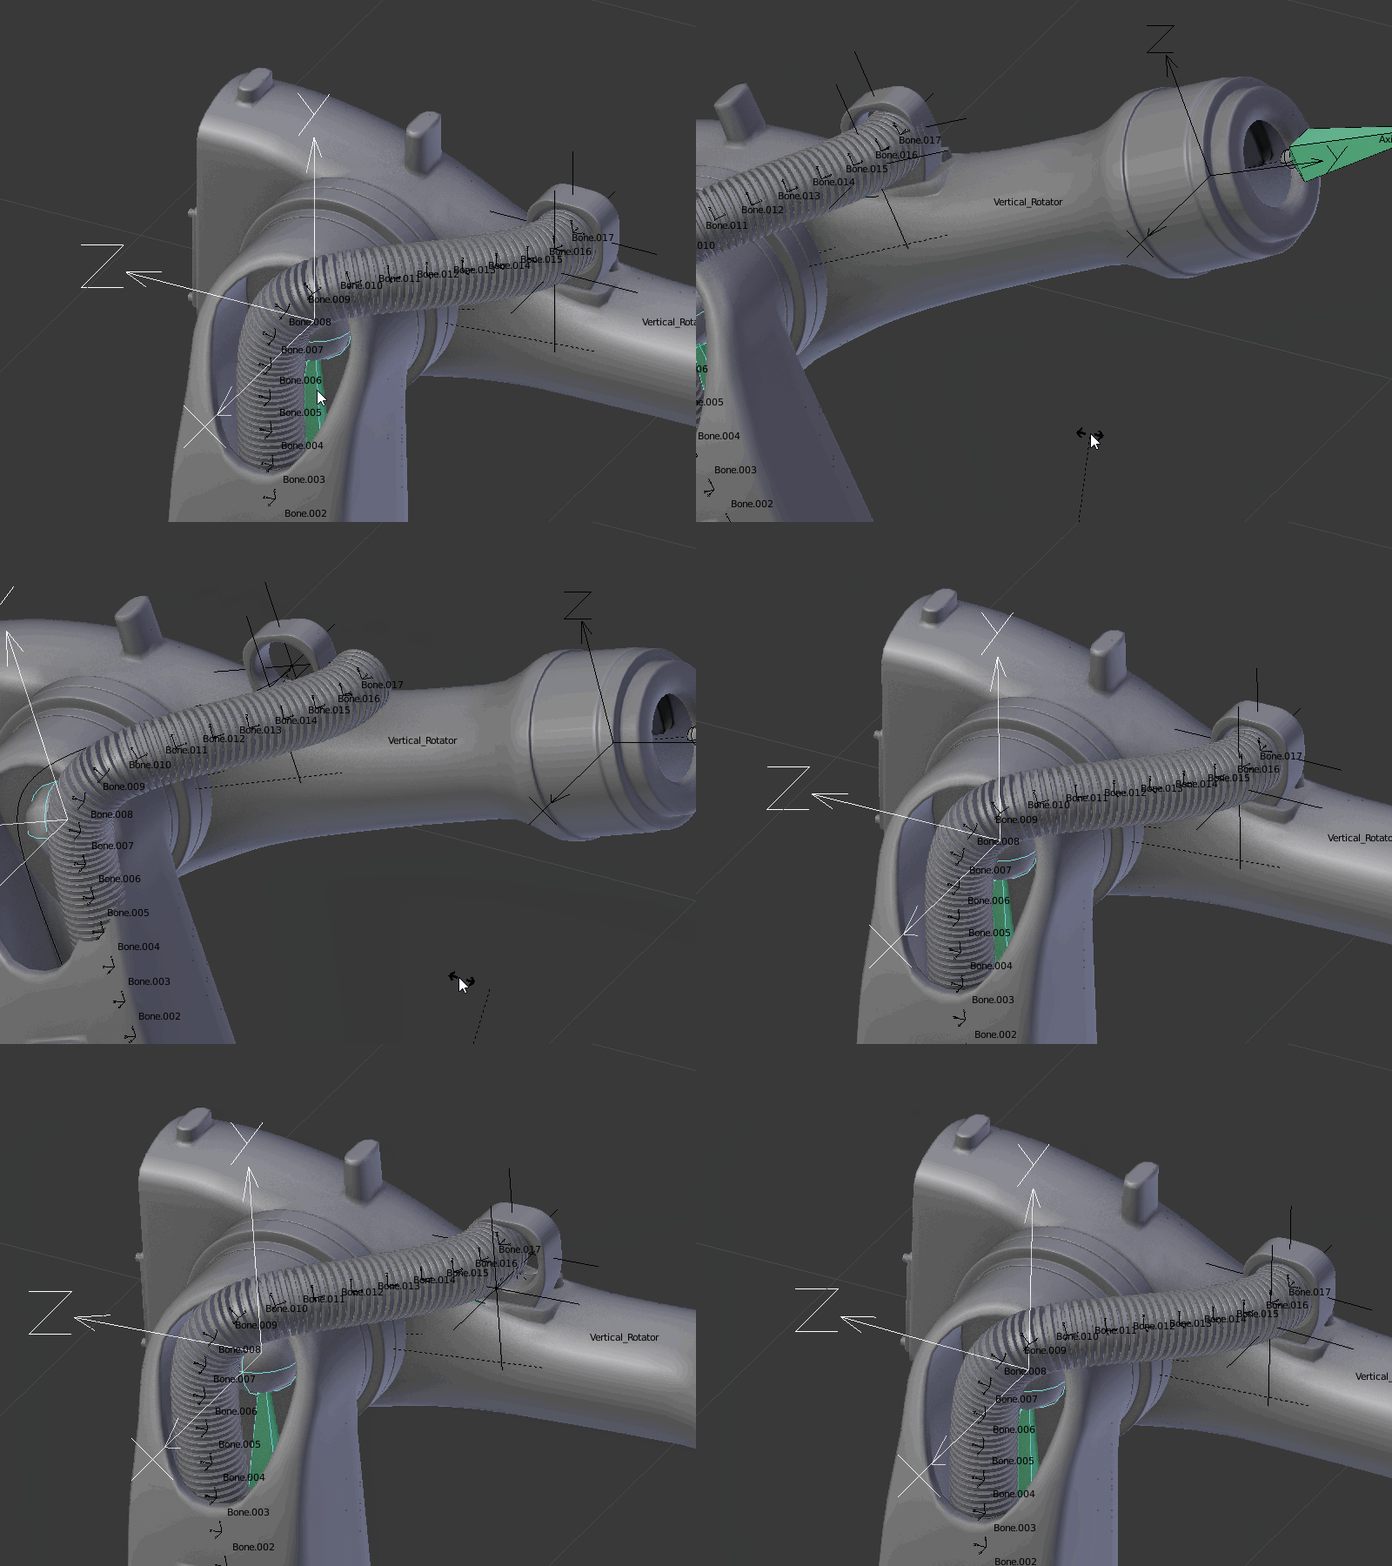
Problem is with a cable on top. The cable jumps in between frames. It’s position is ok in every frame (when static) but it behaves strange in animation which then also shows in exported animation. Here is a clip:
Link for .blend download:link
Do you guys have any idea what’s going on here ?
September 26, 2017 at 1:33 am #31501You have a dependency cycle in your rig.
It looks like you are using a spline IK?
If you are – the splineIK bones can’t be part of the same armature as the control rig. (otherwise you will have a dependency cycle)
September 26, 2017 at 8:42 am #31502@Wayne Dixon thank you for your answer. You are right, I am using spline IK and the spline IK bones are part of the control rig. Both cables were their own armatures at first. However, if I have 1 armature for each cable and 1 armature for the body of the robot (3 armatures in total) I get into trouble in the action editor. I am not able to put simple arm movement into one action cuz 3 armatures. Do you know of any simple way around this ? (I’ve only found this: link) @danpro
September 26, 2017 at 6:53 pm #31503You will only need 2 armatures.
1 for the deformations (both the splineIK chain of bones) and then 1 control rig
And then you can constrain all the bones from the DEF rig to copies of the bones in the CTRL rig.
Now when I say “all the bones”, I only mean “all the control bones from the DEF rig”. The hooks essentially. You don’t need to copy the entire chain of bones.
(I hope that makes sense)
So at the end of the day you will only have animation on the control rig – not 3 rigs.
Oh and use bones as your hooks rather than empties (that is the super old way)
September 28, 2017 at 3:08 pm #31504@Wayne Dixon I read it like 30 times. Tired to do it. Failed. I just don’t get it. It goes like this (bottom to top):
- (cable) Mesh with vertex groups from bones
- The Bones with Spline IK
- The Spline IK curve
- The Curve’s hooks
- The Hook’s empties parented to the mesh of the body. (could by changed to bones, yes)
I need 2 RIGs: CRTLrig and DEFrig. What should be included where ?
September 30, 2017 at 9:20 am #31505I would ditch the spline IK and the hooks and empties. It’s not worth the hassle to have multiple armatures or multiple actions for a rig. (Bones can be used as targets for the hook modifier.) Spline IK can be useful in some instances but wires/tubes/hoses can easily be rigged with regular IK and segmented bones. (Bendy bones). Segmented bones will allow you to use far fewer bones in the IK chain as well. The hose may need to be converted to a mesh object depending on how you have created it.
I clicked the link to your file, but it wants me to register. If you could upload the file to pasteall.org (run by the CGC crew), I’d be happy to take a look. Just paste the link here and I will try to look at it sometime this weekend.
Good luck!
September 30, 2017 at 2:08 pm #31506@danpro thanks for looking into this. You are the God of Blender rigging. I watched some of your videos. Amazing. If you did a course about Blender rigging (zero to hero style) I would be willing to pay triple digits for it. Something like Space VFX of Rigging. OK, back on topic.
Here are the files:
I think IK version is the way to go but it’s far from perfect (Spline IK version has cyclic dependency and Bendy Bones are not supported by Unity).
October 1, 2017 at 12:04 pm #31507Thanks for the kind words, but my status as a “god” has been greatly exaggerated. My proof is, Wayne had a better comprehension of your end goals. I completely missed that you wanted to rig this for Unity. So, I will retract my suggestion to use bendy bones and regular IK. With that said, I am still not sure if this solution will work for you as I do not rig for Unity. I have no idea how using curves and spline IK will convert when you import from Blender to Unity.
Wayne has given the solution, so I just went ahead and packaged it up with the changes to your spline IK file. I did change some things in your file to make it a bit easier to work. The first three scene layers have the mesh objects, (#1-Main non deforming arm meshes, #2-Curves, #3 Pipe meshes) The second row of scene buttons have the armatures (#11-ControlRig, #12-SplineRig)
Some changes to the ControlRig:
1. Parented the curves to the root bone (Base)
2. Added new bones to control the curves and parented them to appropriate bones.
LowerSpline.001-004, parented to Horizontal_Rotator
LowerSpline.005, UpperSpline.001-003, parented to Arm_Rotator
UpperSpline.004-005, parented to Vertical_Rotator
Feel free to change the parenting of these hook control bones if you do not like the deformation of the curves. This is what looked good to me with minimal testing.
These new bones replace the empty objects used for the hook modifiers.
Note: To hook a curve to a bone, select the bone you want to hook to (armature in Pose mode), Shift select the curve, Tab into edit mode of the curve, Select the vertices you want to assign to the bone, CTRL-H, Hook to Selected Object Bone.
3. Removed all spline IK bones and separated them into their own armature. Renamed SplineRig.
4. Some clean up on translation locks for all bones. (Locked scale for most bones, switched to Euler rotations for bones that only need to rotate on a single axis.)
SplineRig:
1. Only contains the bones for each spline IK chain.
2. Pipe meshes are parented to the SplineRig with Armature Deform. Preserve Volume is enabled on the armature modifiers to help with deformations.
3. SplineRig is parented to the ContolRig, Object to Object parenting so the spine rig does not get lost.
4. An object constraint was added to the SplineRig to copy the scale of the ControlRig Base bone. This was the only way to get the Base bones scale transforms to scale the pipe meshes correctly.
5. The SplineRig can largely be ignored, left in object mode, and hidden on an unused scene layer.
I would add action constraints to the Upper and Lower Spline controls to aid in deformations when the arms are bent to extreme angles if you want to automate the deformations a bit.
File: http://pasteall.org/blend/index.php?id=47954
Good luck!
October 1, 2017 at 5:53 pm #31508I haven’t read the entire posts but I’ll just add some of my thoughts on my experience with Unity to Blender.
Unity doesn’t like bendy-bones (actually no software other than Blender likes bendy-bones). So I’ve found that it is better to use 2 rigs when exporting to Unity.
1 rig that does all the deformations and 1 rig that does all the controls.
Then after it is animated – you export all the baked animations on the deformation rig.
This means that Unity has 1 rig with zero constraints – which means less chance of things going wrong.
(I won’t say zero chance because stuff always goes wrong haha)
Good luck – and don’t give up the fight. Software is dumb, people are smart. You’ll win eventually.
October 2, 2017 at 4:10 pm #31509@danpro it’s gonna take me some time to get familiar with those changes. Thank you very much.
@Wayne Dixon how do you animate and export those 2rigs models ? I tried to export one simple action using this new rig and Unity Import Clips window shows ControlRig|MySimpleAction and SplineRig|MySimpleAction 🙁 . The first one moves only the body and the second one moves only the cables.
Anyway, thanks again guys 😉 .
October 3, 2017 at 5:56 pm #31510Move all the deformation bones into one armature, and the controls into the other. Think of it like this.
The Control rig moves the DEF rig, and the DEF rig moves the mesh.
Bake the animation onto the DEF rig and then export that to Unity. So you will only have 1 rig in Unity (I actually don’t know very much about Unity sorry, Gonzo handles that side of things)
To move all the deformation bones into a second rig just duplicate all the bones that actually do the deforming, (shift+d) and separate them into a new armature (p), then join that armature with your existing spline armature. (ctrl+j) Then add a “copy transforms” on all these new bones to the same bone in the control rig (use python for that so you don’t go crazy)
This is advanced stuff so if you struggle to understand, don’t worry that is totally normal!!
October 9, 2017 at 3:29 pm #31511@Wayne Dixon so I did everything you said. Mesh for the top cable still moves funny in Unity. It’s perfect in Blender. At this point I am starting to think this is just not worth it. Maybe I will export the model without animations it and try to animate it in Unity. My last option is to remove those cables completely and create som kind of bezier curve – cylinder magic in unity (LOL).
October 11, 2017 at 6:07 pm #31512Sorry that I don’t know more about Unity to help you out. But hopefully you learned a bunch about some rigging tricks 😉
October 15, 2017 at 9:40 am #31513You are right, I learned a lot. Thanks guys. I looked at it again and now I think I know where the problem is. Blender baking works kinda strange. It does not preserve bone constraints as it should. Bone constrain to visual key conversion is just not working correctly. Here is what I mean:
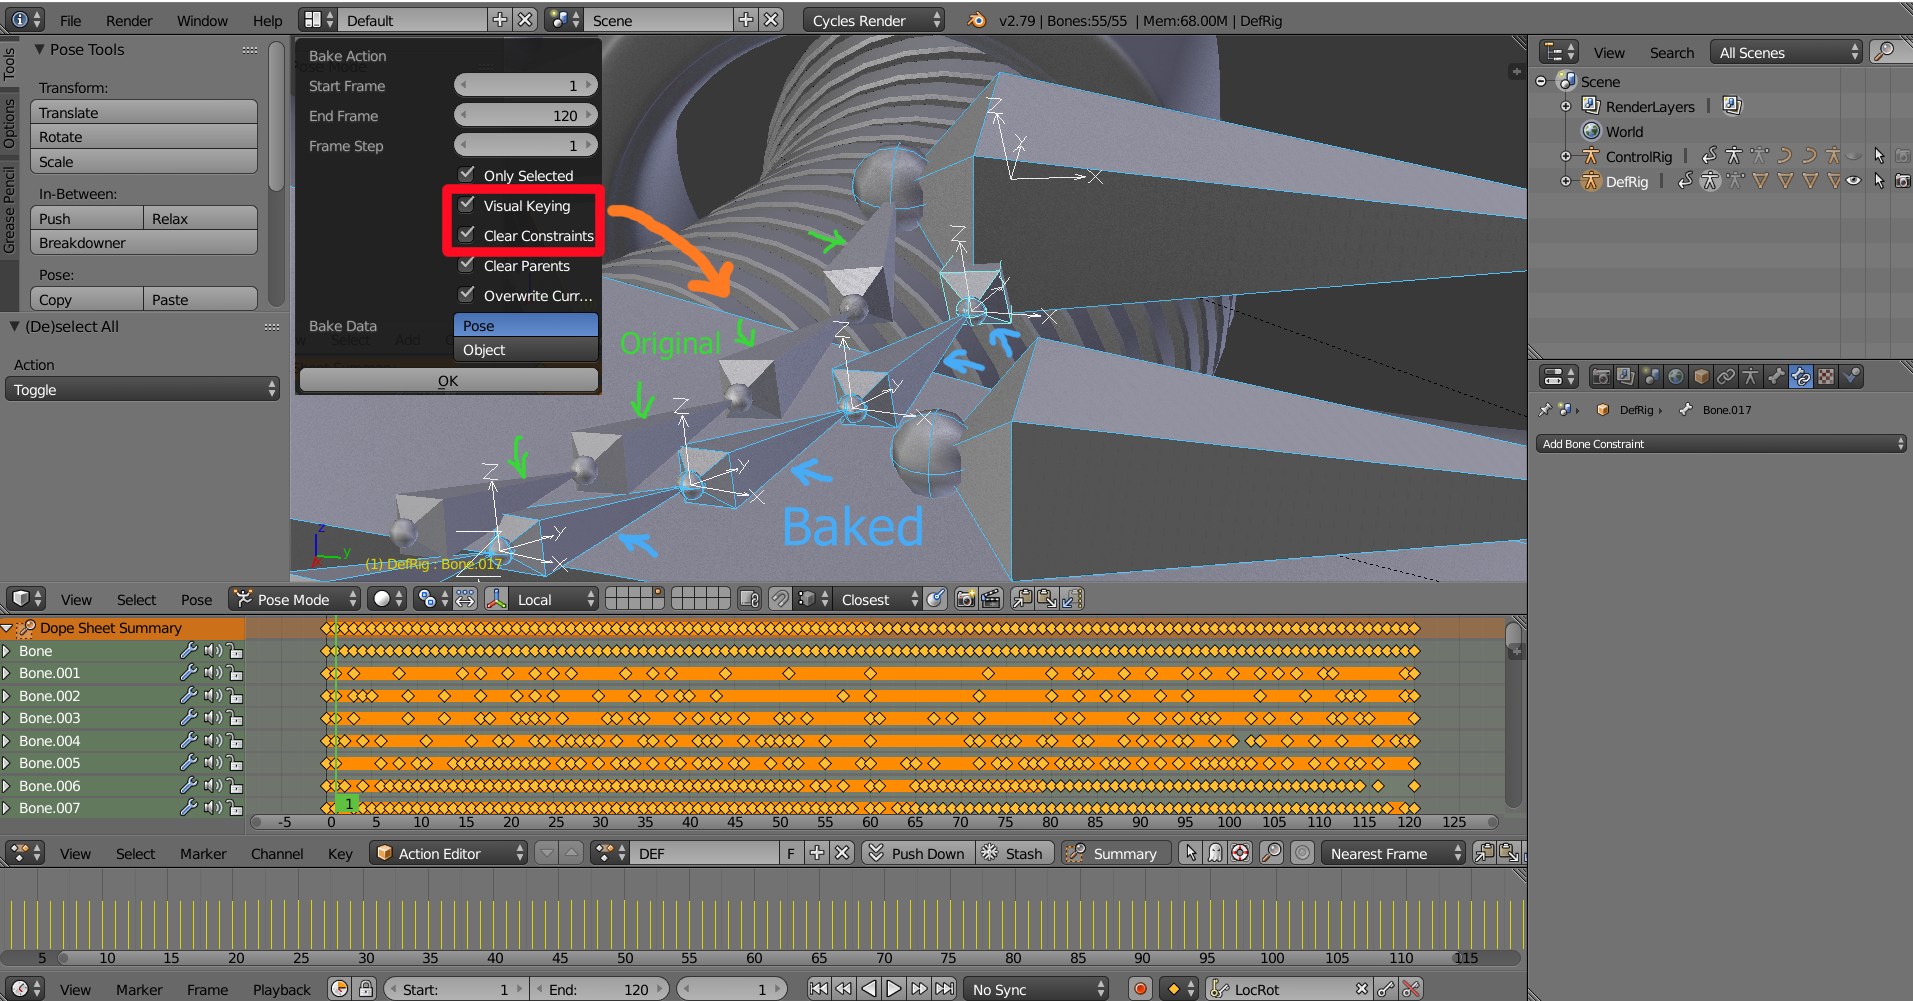
(Green arrows show ControlRig bones which are in correct position and blue arrows show DefRig bones after baking, I also pasted baking window to show settings used. There should be no difference between green and blue bones because before baking there is none as all DefRig bones have CopyTransforms on them targeting corresponding ControlRig bones.)
Anyone who knows what is going on, please help 🙁
October 16, 2017 at 7:08 pm #31514Yes baking can be hard.
I usually try a bunch of different option combinations until it’s correct.
But “visual keying” will key it in where it is in world space so that if you remove the actual constraint, it will be in the same “visual location”.
I don’t think you will want to “clear parenting” but I think you will have to use “visual keying” and “clear constraints”.
-
AuthorPosts


- The topic ‘Robot RIG strange behaviour’ is closed to new replies.