
how to apply a gradient bloom color?
Forum Archive › how to apply a gradient bloom color?
- This topic has 11 replies, 3 voices, and was last updated 3 months ago by
Dwayne Savage.
-
AuthorPosts
-
May 28, 2026 at 9:42 am #21595
I’m doing the sessions type course and trying to do my company’s logo (a custom letter) but we have a gradient going from a bright to dark color and I want to keep that bloom going out a little more at the bottom of the image here because obviously darker color = less light to play with in glare. the method I went with first was to change the emission color to a wave textured color ramp. I tried to figure out a way to do the color gradient from compositor so the glare would gradient equally too but I couldn’t figure it out.
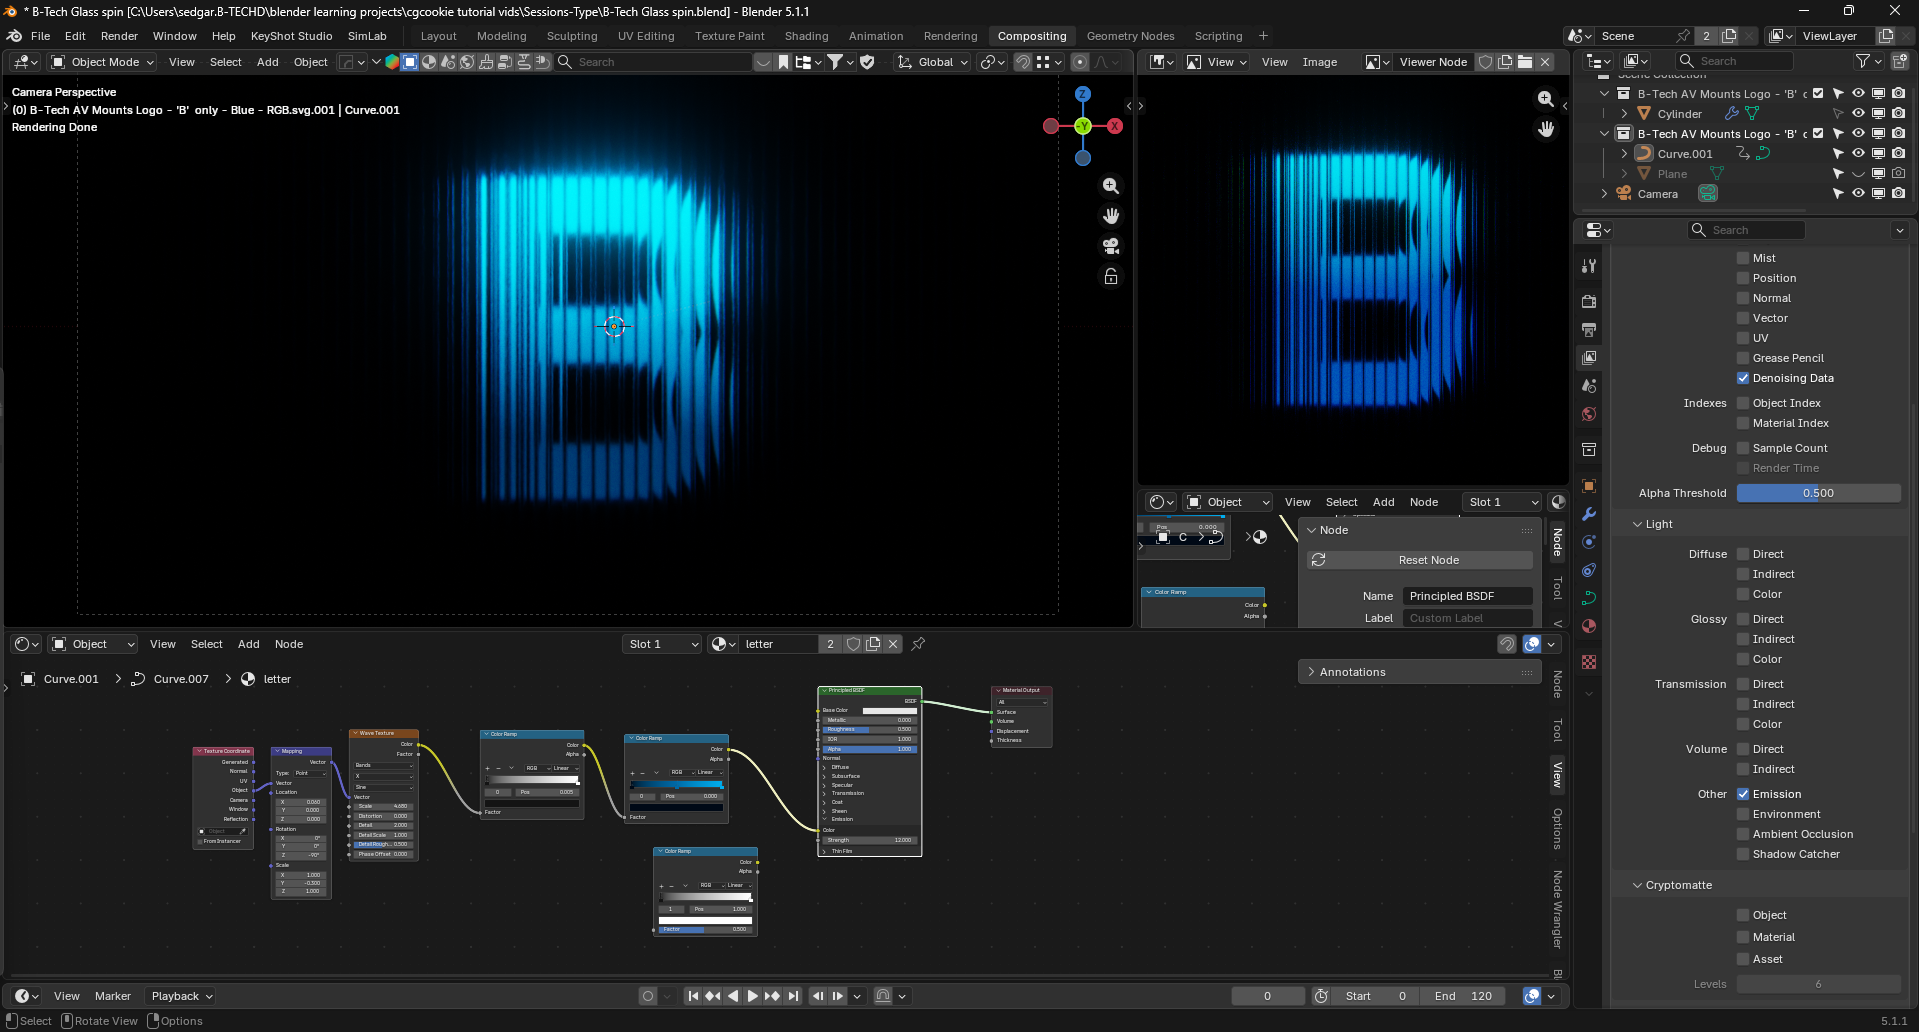

As you can see the bloom is mostly applying to the top cause of the brighter emisssion color up there. I can’t use base color because the world brightness is at 0% and I’ve made the B object rays invisible so it doesn’t come out wrong during the animation where it clips so it’s just the light coming through not the object.
tldr: How do I get the bloom on bottom of the B just as bright as the top but in the corresponding color?
May 28, 2026 at 2:50 pm #100391You can use a gradient texture node. As for the bloom. Lower the threshold. The threshold is how bright the emissions need to be for bloom to be applied.
May 28, 2026 at 4:12 pm #100392Hi Sam,
Not sure if I understand what you want. Not even sure if you know what you want, to be honest. Color is super difficult and digital color even more so. It’s a complete rabbit hole and only a handful of people really know what they’re talking about. But anyway:
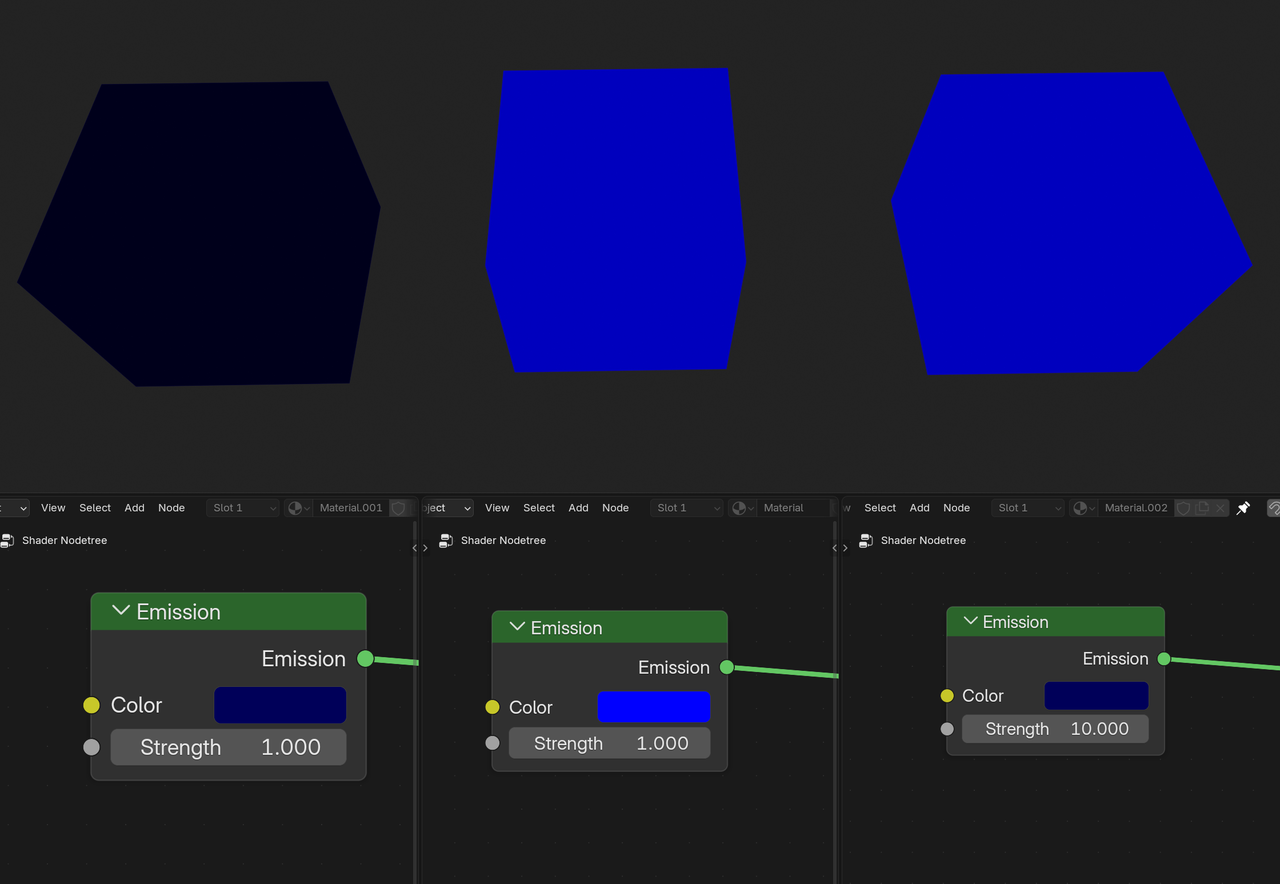
If you have a color with a gradient, the darker part looks less bright than the lighter part. If you want the darker part to be as bright as the lighter part, that darker part will automatically become lighter:
 May 28, 2026 at 6:03 pm #100393
Obviously yeah adjusting the strength just brightens and changes the colour. I guess instead of the emission strength or colour changing what I’m looking for is the bloom to be just be as bright at the bottom as it is at the top. I guess the only other simple way to say it is I want the bright blue glow at the top and a dark blue glow at the bottom just as ‘glowy’
May 29, 2026 at 12:54 am #100394“…the bloom to be just be as bright at the bottom as it is at the top. I guess the only other simple way to say it is I want the bright blue glow at the top and a dark blue glow at the bottom just as ‘glowy’”
And what did I just say? What goes for the Emission Color also goes for the Bloom Color; so darker Bloom looks less bright.
Maybe I don’t know what you mean by ‘glowy’.
May 29, 2026 at 2:35 am #100395no you’re pretty much right I guess it’s just not possible..
May 29, 2026 at 2:42 am #100396 I guess going for something like this.. just darker shade of blue but still emmittingMay 29, 2026 at 2:04 pm #100397
I’m not at my computer, but one way that comes to mind is to create a full copy of the scene. This can be done in the scene controls in the top right-hand side of the topbar. Next to the Workspace tabs. This will create Scene.001. Then invert the gradient (Flip your color ramp) on the material in the new scene. Do a render (F12). Switch back to scene. Then in compositor add a new render layer node and select scene.001 at the bottom. This can be used to give the brighter bloom on the bottom. Then you just need to mask out the Scene.001 leaving the bloom. You might be able to do this by turning on transparent in the render setting of Scene.001 and then use an invert node on the alpha channel. Then just combine the bloom with a mix color node using the alpha as the factor. I’ll have to play with it when I get home from work.
***Edit*** You might want to play with the setting under highlights on the Bloom node before trying the above. This will allow you to clamp the brightness of the bloom while lowering the threshold. This keeps the Bloom in a more even color when you have such drastic brightness level if I’m remembering correctly.
May 30, 2026 at 3:26 am #100398…or make the letter(s) a uniform Color and add the gradient at the end of your Compositing, maybe something like this:
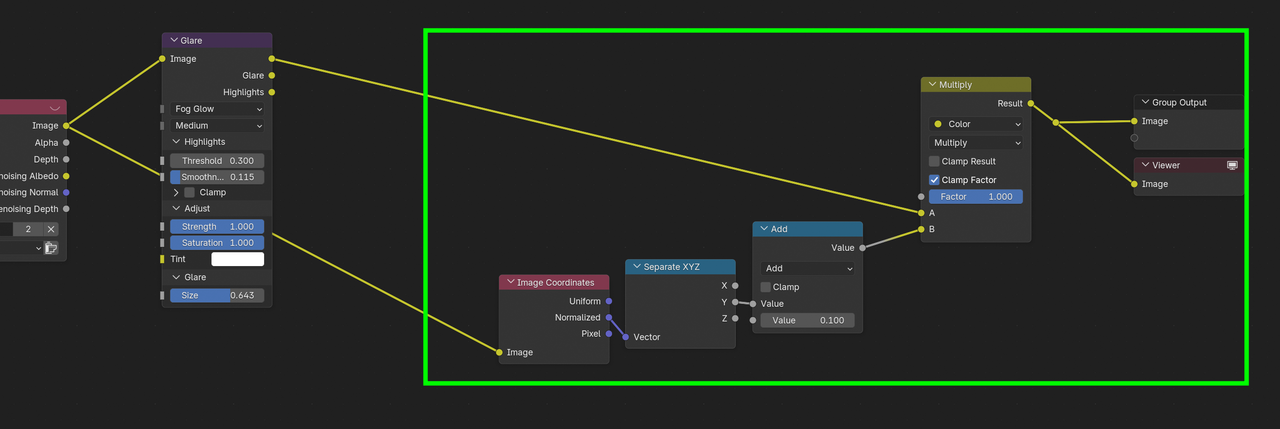
Might not give you the result you are looking for, because of what I already mentioned about ‘darker’ Colors, but it difinitely has equal amount of Bloom everywhere.
May 31, 2026 at 11:50 am #100399I’ve been playing around and I think I have a workable solution. It requires some setup before the compositor.
Setup View Layers (AKA Render Layers):
- In 3D viewport, select the letter and press M->New collection->Give it a name. I named mine Layer 1.
- Shift+D and right click. This duplicates the letter and doesn’t move it.
- Press M->New Collection->Give it a name. I name mine Layer 2.
- In top right-hand corner where it says ViewLayer. Click in there and rename to Layer 1.
- Click the Icon next to the name Layer 1 and click New. Then change the name to Layer 2.
- In outliner next to Layer 1 (Or the name you gave it.) collection, uncheck the check box.
- In view layer control, click icon to the left of the name Layer 2 and select Layer 1.
- In outliner, uncheck the check box next to Layer 2 (Or your collection name).
Setup Material:
- Select the Letter object in Layer 2 collection.
- In properties editor under materials tab or in the shader editor’s header, next to the material name click the number 2 Icon to make this material it’s own material.
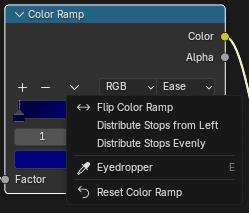
- In the shader editor, on your color ramp for the gradient click the drop down->Flip Color Ramp.
- Save your file (Ctrl+S for direct save or Ctrl+Alt+S for Incremental save.)
- Press F12 to render both layers.
Compositor:
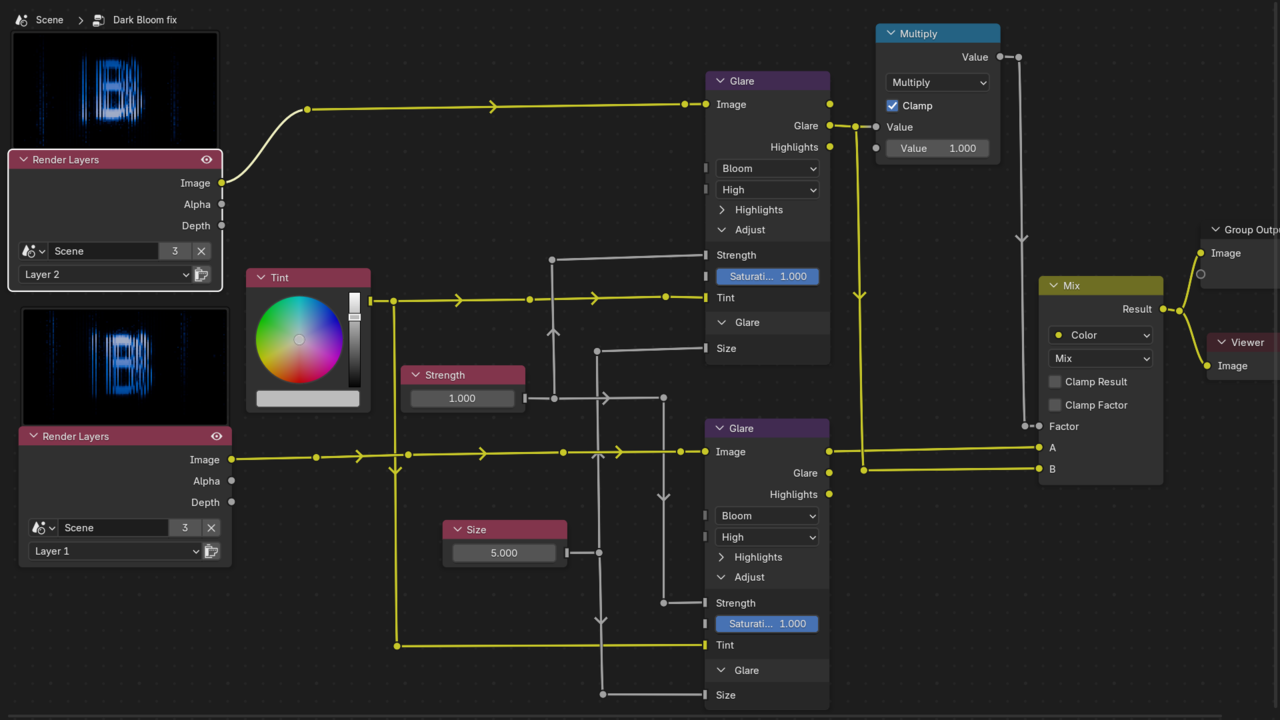
I use a Color and 2 value nodes(Shift+a->Input->Constants) to make sure the glare nodes have the same values. I duplicated the the Render Layers node and changed it from Layer 1 to layer 2. I added a Multiply so I can adjust the effect. Note that I use the Glare output of Layer 2’s Glare node, because that is the only part I want to add to Layer 1. Here is my node setup.
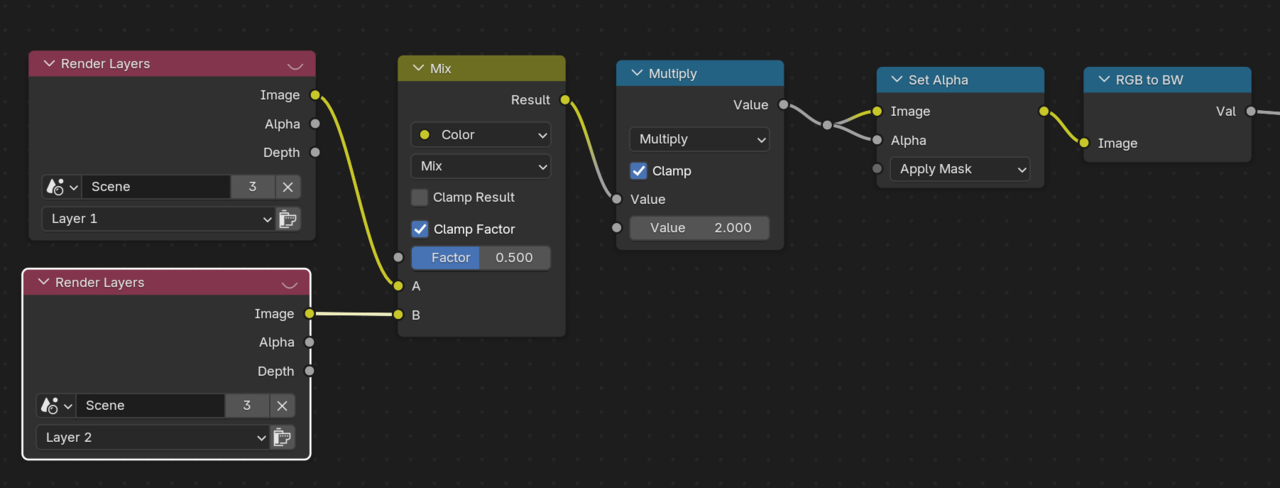
If you want to mask out the letter then you would do something like below. Again I used a multiple to add ability to adjust. Instead of a multiply node you can use a color ramp node set to constant and setting the white (Color stop 1) to a really low position. Something like 0.01. I personally like the feathering vs the harsh line of a mask. Note this only works because the background is black. If it wasn’t then you would have to use one of the keying nodes.
 June 1, 2026 at 2:51 am #100400
Maybe I’ve done something wrong but tried both methods you guys came up with and it didn’t really change much but I appreciate the effort I’m just gonna be happy with what I’ve got
June 1, 2026 at 8:34 am #100401Yeah that’s why I added the multiple to increase the effect.
-
AuthorPosts


- The topic ‘how to apply a gradient bloom color?’ is closed to new replies.